Voicemeeter Banana Guide: How to Set Up Your Audio
Learn how to install and configure Voicemeeter Banana on Windows. Master virtual cables to separate game audio from Discord and Spotify easily.
On this page
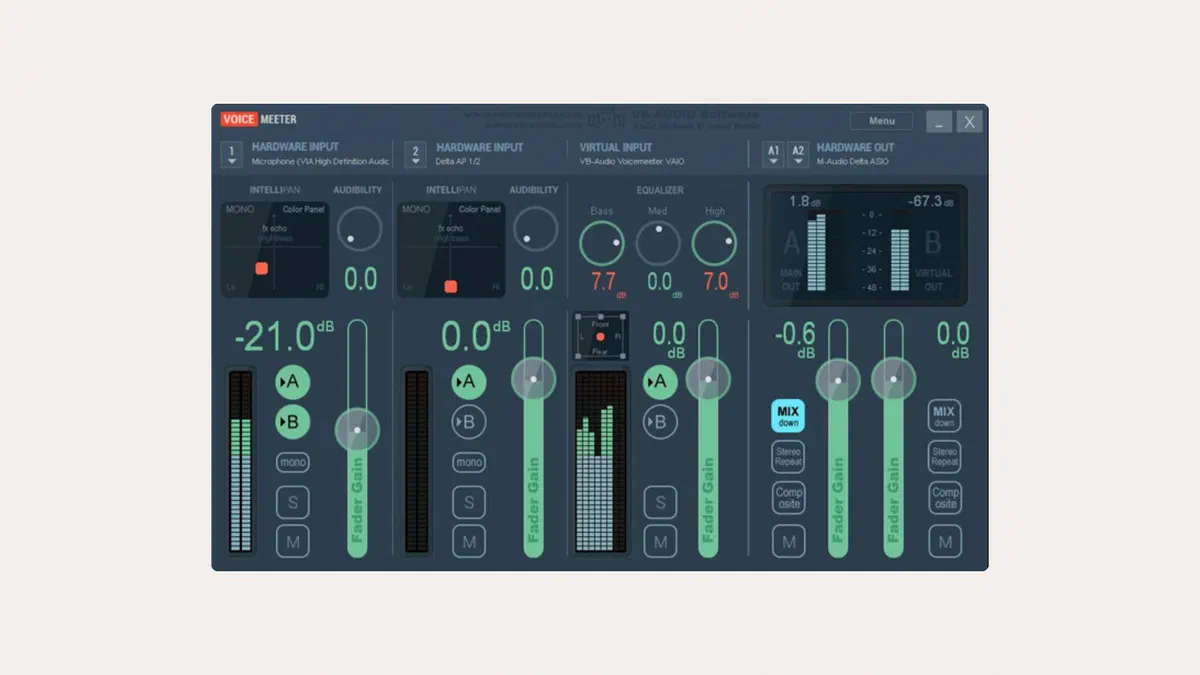
The interface can be intimidating: dozens of knobs and acronyms like A1, B2, and VBAN. However, the logic follows that of a studio mixer and isn’t complicated: sources enter on the left, buses exit on the right, and each colored button decides where everything goes. Once you understand this, the rest is just configuration.
In this guide, we will start with installation, move to the minimum configuration needed to get it working, and reach the reason why almost everyone installs it: keeping game audio separate from Discord and music.
What Voicemeeter Banana does and when you need it #
Windows sends all audio to a single output, leaving little room for flexibility: you can change the volume of individual apps, but you can’t make one track audible only to you while another is heard only by those listening to your stream. Voicemeeter sits in the middle; it presents itself to Windows as a standard sound card and routes the signals.
You need it if you find yourself in any of these situations:
- you are recording or streaming and want music to go to your headphones but not into the recording;
- you use multiple outputs simultaneously, such as headphones and speakers, with independent volumes;
- you want to apply a compressor, gate, or equalizer to your microphone without using external plugins;
- you need to send audio to another application, such as OBS, as if it were an input device.
If you just want to turn up Spotify relative to your game, you don’t need it: the Windows 11 Volume mixer (in Settings → System → Sound) already does this.
Installation #
Always download from the manufacturer’s website: older versions often circulate on third-party download portals.
Open the official Voicemeeter Banana page and download the current version archive.
Extract the contents and run the installation program with administrator privileges.
Restart your computer. This is not optional: the installation registers audio drivers, and until you restart, the audio engine won’t start up properly.
If you want to route audio for individual apps, also install VB-CABLE, a virtual audio cable from the same author. It is a separate package and requires its own restart. Those working with high-quality audio can add Hi-Fi Cable, also by VB-Audio.
It works on Windows 7 and later, including Windows 11, in both 32 and 64-bit, as well as on ARM64. The requirements are minimal: any PC from the last fifteen years can run it.


Why the license is ‘donationware’ and what changes after 30 days
Voicemeeter does not have a paid version with extra features: everything is fully active from the start. After the first month, the program invites you to contribute by activating a license, but it continues to work without limits, expiration dates, or watermarks. The contribution is voluntary and helps support development.
Basic configuration #
Upon first launch, you will see flashing red text in the top right: the main output is missing, and until you select one, no sound will play.

Assigning the main output (A1) #
Click on A1 in the top right and choose where you want to listen: headphones or speakers. In the menu, you will find the same device listed multiple times with different acronyms; this is the choice that has the biggest impact on latency:
| Interface | When to use it |
|---|---|
| ASIO | If you have a sound card or audio interface with native ASIO drivers: this is the fastest |
| KS (Kernel Streaming) | A great compromise for most integrated cards |
| WDM | A stable alternative if KS causes issues |
| MME | Only as a last resort: it introduces noticeable delay |

There are three physical outputs (A1, A2, A3) and two virtual ones (B1, B2). The former send sound to a real device, while the latter pass it to other apps.

Adding inputs #
In the top left, there are three hardware inputs. Click on the Hardware Input 1 header and choose your microphone, preferably using the WDM or KS version; use the other two for virtual cables or a second source. You can right-click the name to rename the track—it’s better to do this after you have more than three channels.

Before speaking into your microphone, turn off A1 and B1 on its column: if you are listening through speakers and the return is active, you’ll get immediate feedback.
The two columns on the right, Voicemeeter VAIO and Voicemeeter AUX, are virtual inputs: this is where audio from apps set to those devices in Windows arrives.
If you have an ASIO audio interface with multiple inputs, you can also find Patch ASIO Inputs to Strips in System Settings: from there, you can route the physical inputs of your card (for example, 1 and 2) directly to a mixer column.


Aligning the sample rate #
Open Menu → System Settings / Options and set Preferred Main SampleRate to 48000 Hz, then make sure your microphone and headphones use the same value in Windows Sound settings. If values differ, the system has to resample the signal in real-time: this is the most common cause of crackling and high CPU usage.
The same value must be set in the virtual device panels. Close Voicemeeter (Menu → Shut Down Voicemeeter) and run the control panels found in the installation folders as administrator—usually C:\Program Files (x86)\VB\Voicemeeter\ (VBCABLE_ControlPanel.exe and VBVMAUX_ControlPanel.exe) and C:\Program Files\VB\CABLE\ for VB-CABLE. In each one, the frequency (Internal, Input, Output) must be identical.


Separating game, Discord, and music #
This is why almost everyone installs it, and it’s based on a single principle: each app is sent to a different device, and then the mixer decides who hears what.
First, set Voicemeeter Input as your default Windows playback device so that general audio is routed there. In the Recording tab of the same panel, set Voicemeeter Out B1 as the default, so apps using the system microphone receive the mixer’s output. Then, you can route individual apps.


In Settings → System → Sound → Volume mixer, choose the output for each open app. This is how you separate browsers like Chrome and Firefox, which don’t allow you to choose the output from within their own settings. Assign your game to Voicemeeter Input, Spotify to Voicemeeter Aux Input, and Discord’s output to VB-Audio Cable Input.
Go back to Voicemeeter: on the game input column, leave A1 on (so you can hear it) and turn on B1 if you want it to be included in your recording.
On the music column, only turn on A1: you will hear it, but it won’t end up in the stream or the recording.
On the column for the channel connected to VB-CABLE (your friends’ voices), only turn on A1. This way, you can hear them without sending their audio back to them.
In Discord, set your input device to Voicemeeter Out B1: others will hear whatever you have routed to the B1 bus—namely, your voice and any audio you’ve decided to share.


This way, every source has its own fader: you can lower the music without touching the game volume, or instantly remove the game from your recording while still hearing it in your headphones. If the game is drowning out your friends, just lower the game’s fader.
Microphone: gate, compressor, and equalizer #
On the microphone column, you’ll find three controls that would be quite expensive on a real mixer.
- Gate cuts off the signal below a certain threshold: this removes fan hum and background noise during pauses. Turn it up until silence is actually silent, then stop; if you go too far, it will cut off the beginning of your words.
- Comp (compressor) reduces the difference between quiet and loud passages, so your voice remains audible even when you move away from the mic. Low values, around 3-4, are usually plenty.
- Intellipan is used to adjust timbre: in Voice mode, you can move the dot within the box to give your voice more body or more brightness. To hear the effect while adjusting, temporarily turn on A1 on the microphone column using your headphones.
The Fader Gain slider at the bottom controls the final level. Keep it so that your voice peaks in the green; if it hits the red, the signal will distort, and there’s no way to fix that later.
For more precise adjustments, right-clicking the EQ button on a bus in the master section opens a 6-band parametric equalizer. For example, applying a cut below 80 Hz on the B1 bus removes rumble without affecting your voice.

Advanced features #
Keyboard volume keys. In the menu, enable Hook Volume Keys (For Level Output A1): your multimedia keys will now control the volume of A1 instead of Windows’ system volume.
Macro Buttons. By enabling Macro Buttons: Run on Voicemeeter Start, a small app with programmable buttons launches with the mixer: you can use a single key to mute your mic, change outputs, or load a specific configuration.

VBAN, audio over the network. VBAN sends uncompressed audio to another PC on the same network: it’s the classic way to do dual-PC streaming (one for gaming and one for broadcasting). Voicemeeter must be running on both.
Open the VBAN panel in the top right. At the top, you will see your PC’s local IP address.

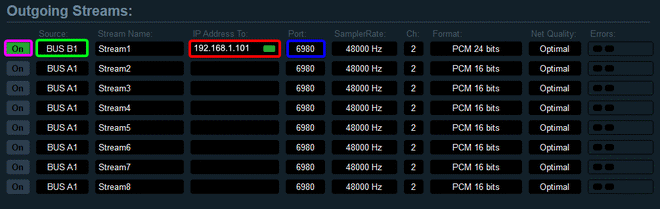
The PC’s IP address is displayed at the top of the VBAN panel On the PC sending the stream, in Outgoing Streams, choose the bus you want to transmit (for example B1), enter the IP address of the receiving PC, and leave the port at 6980. Then, activate the stream.
On the sending PC: source bus, destination IP, and port On the receiving PC, in Incoming Streams, enter the first PC’s IP address, the same port, and the stream name; choose which mixer column you want it to arrive on and set it to ON.
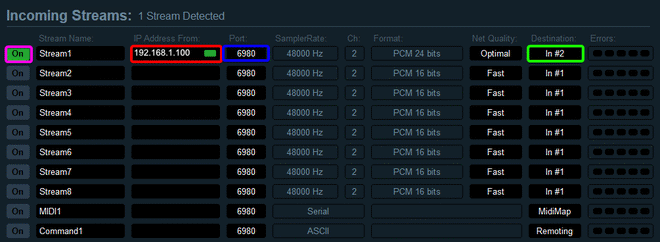
On the receiving PC: source IP, port, and destination column


You don’t need to touch your router at home. However, over the internet, you must open the UDP port on the receiver’s router; since the stream is unencrypted, it is better to use a VPN.
VST Plugins. At the bottom of System Settings, there is Patch Insert, which sends channels to an external program to apply VST effects (you will need a VST host connected to Voicemeeter’s virtual ASIO driver) and then brings them back into the mixer.

Saving configuration and autostart #
A full setup takes time, so make sure to save it. From Menu → Save settings, you can save everything to a file .xml; with Load settings, you can restore it after changing peripherals or reinstalling.
You can also enable System Tray (Run at Startup) from the menu so that the mixer starts with your computer and stays in the notification area. Without this option, the audio engine won’t be active when you log in, and apps targeting virtual devices will remain muted.

Common issues #
No sound after installation. Nine times out of ten, you either forgot to restart or A1 hasn’t been assigned.
Crackling or stuttering audio. Increase the buffer in System Settings (within the field for the driver you are using: WDM, KS, or ASIO) until the problem disappears. The higher the buffer, the greater the latency: increase it in small steps.
Others in chat can hear an echo. You are routing their voices back to them via the B1 bus. Check the column connected to VB-CABLE and turn off B1.
Microphone is too quiet. Before turning up the fader, check the level in Windows under Settings → System → Sound → Microphone: if it’s set to 20%, Voicemeeter will amplify an already weak signal, which also increases background noise as you turn up the volume.
FAQ #
Is Voicemeeter Banana free? #
Yes. All features can be used without paying. After thirty days, a prompt to contribute will appear, but the program continues to work without limits or expiration dates: the developer themselves describes it as “pay what you want, when you want.”
What is the difference between Voicemeeter, Banana, and Potato? #
The number of channels changes. The base version has 3 inputs; Banana has 5 with an equalizer and recorder; Potato has 8 with features designed for those working with many sources simultaneously. Operation and controls are the same: if you know how to use Banana, you’ll know how to use the others too.
Does Voicemeeter increase audio latency? #
It always adds a little bit of delay because the signal passes through a software mixer. With ASIO or KS and a low buffer, it’s only a few milliseconds—hardly noticeable even while gaming. However, with MME, the delay is noticeable, which is why it should be avoided.
Do I need VB-CABLE in addition to Voicemeeter? #
Not always. Banana already includes two virtual inputs, which are enough to separate two groups of apps. You only need VB-CABLE when you require an extra path, usually to isolate voice chat from everything else.
How do I uninstall it if something goes wrong? #
Use the uninstaller in the installation folder and restart your computer immediately afterward. Before doing this, however, set a physical device as your default Windows output: if you uninstall while a virtual device is set as default, you’ll be left without audio after the reboot and will have to fix it manually.
How do I prevent my own voice from coming back through my headphones? #
Echo occurs when the microphone column sends the signal to the same output you are listening to. Turn off A1 on the microphone column and leave only B1 active: others will hear you, but you won’t hear yourself.