How to Install and Configure Apache on Ubuntu and Windows
Learn how to install the Apache web server on Ubuntu and Windows, including virtual hosts, mod_rewrite, and firewall configuration.

On this page
Apache HTTP Server has been around since 1995 and remains one of the most widely used web servers: it receives requests from the browser and serves pages, either on its own or alongside PHP and a database. Let’s look at the installation on both systems and then cover the essentials you’ll need immediately after: firewalls, virtual hosts, and modules.
Installing Apache on Ubuntu #
These commands work on Ubuntu 26.04 LTS (the latest long-term support version) as well as previous supported LTS versions, 24.04 and 22.04. Administrator privileges are required.
Update the package list and install the server:
sudo apt update
sudo apt install apache2
Verify that the service has started:
sudo systemctl status apache2If you see
active (running)everything is fine. Otherwise, start it withsudo systemctl start apache2.Open your browser to
http://localhost: the default “Apache2 Default Page” should appear. If the server is a different machine, you’ll need its IP address, which you can find usinghostname -I(usually the first one in the list), and enter it into your browser ashttp://indirizzo-ip.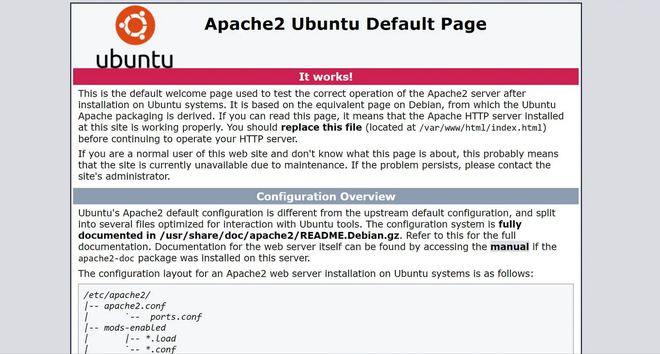
If you see this page, the server is installed and listening

From here on out, these are the four commands you will use most often:
sudo systemctl start apache2      # avvia
sudo systemctl stop apache2       # ferma
sudo systemctl restart apache2    # riavvia
sudo systemctl reload apache2     # ricarica la configurazione senza interrompere le connessioni
After making configuration changes, use reload: ongoing requests will not be interrupted.
Apache starts automatically every time you boot up. If you don’t want this, disable it with sudo systemctl disable apache2 and re-enable it with sudo systemctl enable apache2.
The UFW firewall #
On Ubuntu, the firewall is called UFW, and you must instruct it which ports to leave open. Apache registers three profiles by default:
sudo ufw app list
The list shows Apache (port 80 only), Apache Secure (port 443 only), and Apache Full (both). I recommend opening Apache Full directly, because you’ll be adding an HTTPS certificate sooner or later; if you only need HTTP for now, use 'Apache':
sudo ufw allow 'Apache Full'
sudo ufw enable
sudo ufw status
sudo ufw allow OpenSSH. Enabling UFW without that rule will close the port you are connected through and lock you out of the server.Where the files are located #
| Path | Content |
|---|---|
/var/www/html | Default website files |
/etc/apache2/apache2.conf | Main configuration |
/etc/apache2/ports.conf | Ports Apache listens on (80, and 443 with SSL) |
/etc/apache2/sites-available/ | Available virtual hosts |
/etc/apache2/sites-enabled/ | Active virtual hosts (links to the previous ones) |
/var/log/apache2/access.log | Access log |
/var/log/apache2/error.log | Error log: the first place to look when something goes wrong |
Installing Apache on Windows #
For Windows, the project only distributes source code and refers you to third-party builds. The most popular and up-to-date is from Apache Lounge, listed on the official download page. Apache Haus, which appears in many guides, hasn’t been updated since 2022: skip it.
Free up port 80. If you have enabled IIS (Microsoft’s web server included in Pro editions), disable it via Turn Windows features on or off by unchecking Internet Information Services. Further down, you’ll find how to discover which other program is occupying the port.
Install the Visual C++ Redistributable required by your chosen build: this is listed on the download page and is the most common cause of startup failures.
Download the 64-bit ZIP archive and extract the
Apache24folder intoC:\, so that you haveC:\Apache24. This is the path the default configuration expects.Open
C:\Apache24\conf\httpd.confwith a text editor. If you extracted it elsewhere, correct theSRVROOTvariable at the top of the file—which all other directives use as a base—always using forward slashes:Define SRVROOT "c:/Apache24"While you’re at it, remove the hash symbol before
ServerNameand typeServerName localhost:80: this prevents the AH00558 warning on every startup.Open Command Prompt as administrator and test the configuration:
cd C:\Apache24\bin
httpd.exe -t
The expected response is
Syntax OK. If there is an error, the message will indicate the file and line that needs fixing.Register Apache as a Windows service so it starts automatically on boot:
httpd.exe -k installStart the service and verify via
http://localhost:httpd.exe -k start
To manage it later: httpd.exe -k stop stops it, httpd.exe -k restart restarts it, and httpd.exe -k uninstall removes the service. You can also find it under Windows Services (services.msc) named Apache2.4: by double-clicking, you can choose whether to set it to start automatically or manually. In manual mode, you can start it with net start Apache2.4 from an administrator prompt.
The installation also includes ApacheMonitor.exe, a small icon in the notification area that allows you to start and stop the server without opening the prompt.
If port 80 is already in use
On Windows, port 80 is often taken by other programs: IIS, older versions of Skype, or certain system services. To find out which one is using it, use a command prompt with administrator privileges:
netstat -aon | findstr :80
The last number in the row is the process ID (PID), which you can look up in Task Manager under the Details tab. You can either close that program or move Apache to another port by modifying httpd.conf:
Listen 8080
In that case, the site will respond on http://localhost:8080.
Moving website files #
By default, Apache serves files from C:\Apache24\htdocs. If you prefer to keep your sites on another drive, for example to simplify backups, change both httpd.conf and DocumentRoot as well as the following <Directory> block:
DocumentRoot "D:/Siti"
<Directory "D:/Siti">
Then place an index.html file in the folder, restart the service, and reload http://localhost.
What about macOS? #
macOS comes with a preinstalled version of Apache, but it is outdated. It’s easier to install one using Homebrew:
brew install httpd
brew services start httpd
Configuration files are located under /opt/homebrew/etc/httpd/ on Apple Silicon Macs, and the server responds on port 8080 by default.
Virtual hosts: multiple sites on the same server #
A virtual host tells Apache which folder to serve based on the requested site name. It is worth using even for a single site, as it keeps your configuration separate from the default one.
On Ubuntu #
Create the website folder and assign permissions:
sudo mkdir -p /var/www/esempio.test/public_html
sudo chown -R $USER:$USER /var/www/esempio.test/public_html
Create the
/etc/apache2/sites-available/esempio.test.conffile with this content:<VirtualHost *:80> ServerName esempio.test ServerAlias www.esempio.test DocumentRoot /var/www/esempio.test/public_html <Directory /var/www/esempio.test/public_html> Options -Indexes +FollowSymLinks AllowOverride All Require all granted </Directory> ErrorLog ${APACHE_LOG_DIR}/esempio.test-error.log CustomLog ${APACHE_LOG_DIR}/esempio.test-access.log combined </VirtualHost>Enable the site, disable the default one, and reload:
sudo a2ensite esempio.test.conf
sudo a2dissite 000-default.conf
sudo apache2ctl configtest
sudo systemctl reload apache2
To test it locally, add the line
127.0.0.1 esempio.testto the/etc/hostsfile.
The AllowOverride All directive is what allows .htaccess files to work; without it, rewrite rules in subdirectories are ignored.
On Windows #
The mechanism is the same, but virtual hosts are located in conf/extra/httpd-vhosts.conf, which must first be enabled by removing the hash symbol from the corresponding line in httpd.conf:
Include conf/extra/httpd-vhosts.conf
Then define the hosts using the same syntax seen above, using Windows-style paths (c:/siti/esempio/public_html), and add the matching entry in the C:\Windows\System32\drivers\etc\hosts file, which must be opened with an editor run as administrator.
Enabling mod_rewrite and other modules #
mod_rewrite rewrites addresses: it is used by WordPress’s readable URLs, PHP framework routing, and any redirect written in a .htaccess file. It is disabled by default.
On Ubuntu:
sudo a2enmod rewrite
sudo a2enmod headers
sudo a2enmod ssl
sudo systemctl restart apache2
On Windows, you modify httpd.conf by removing the hash symbol from the module lines:
LoadModule rewrite_module modules/mod_rewrite.so
LoadModule headers_module modules/mod_headers.so
In both cases, mod_rewrite only works if AllowOverride All is also present in the <Directory> block of the website folder. When rewrite rules aren’t working, this is usually what’s missing.
To see the list of active modules: apache2ctl -M on Ubuntu, httpd.exe -M on Windows.
When something isn’t working #
Apache won’t start. Try testing your configuration with apache2ctl configtest or httpd.exe -t: the error will indicate the file and line number. On Windows, make sure you have installed the required Visual C++ Redistributable.
403 Forbidden Error. Folder permissions issue or a missing Require all granted directive in the <Directory> block. On Ubuntu, files must be readable by user www-data.
Rewrite rules are being ignored. The module is not active, or AllowOverride is set to None.
The default page appears instead of your site. The virtual host hasn’t been enabled, or the name in the hosts file does not match what was written in ServerName.
In any case, the first place to look is the error log: /var/log/apache2/error.log on Ubuntu, C:\Apache24\logs\error.log on Windows.
FAQ #
Which is better: Apache or Nginx? #
It depends on your workload and what you need to serve. Nginx handles many concurrent connections more efficiently with low resource usage, and it is the most common choice for high-traffic sites. Apache is simpler for beginners, supports per-directory configuration using .htaccess files (which Nginx does not), and is what you’ll find on most shared hosting providers. Often, they are used together: Nginx in front, Apache behind.
How do I add PHP support? #
On Ubuntu, it’s a single command: sudo apt install php libapache2-mod-php, followed by a service restart. On Windows, you need to download the “Thread Safe” version of PHP separately and link it to Apache by adding lines LoadModule and PHPIniDir to httpd.conf, making sure to use a 64-bit build to match your Apache installation.
Do I need to open ports on my router to be reachable from the internet? #
Yes, to be visible from the outside, you must forward ports 80 and 443 to your computer. Think carefully before doing this: an exposed server must be kept updated and monitored. If you only want to show a site to someone, using a temporary tunnel or a small hosting provider is more secure.
How do I update Apache on Windows? #
Stop the service with httpd.exe -k stop and make copies of httpd.conf, the conf folder, and your website files. Then extract the new version over the old one without overwriting your configuration, verify it with httpd.exe -t, and restart. The registered service remains the same; there is no need to reinstall it.
How do I enable HTTPS? #
On a public server, the standard way is to use Let’s Encrypt with the Certbot tool, which obtains the certificate and configures Apache automatically. For local development, you don’t need a certificate authority: a self-signed certificate is enough. The browser will flag it as untrusted, but you can still browse the site via HTTPS anyway.
What is the difference between restart and reload? #
restart stops and restarts the process, dropping any ongoing connections. reload reloads the configuration while allowing existing requests to finish: on a live server, use this after making changes.