How to Configure Windows Sandbox on Windows 11
Find out what it is and how to configure Windows Sandbox on Windows 11. Follow the step-by-step guide to test software in a secure and isolated virtual environment.

Windows Sandbox is an integrated tool that is indispensable for testing software in total safety on Windows 11. In this complete guide, we will explain to you step by step how to configure and activate this isolated virtual environment on your PC.
What is Windows Sandbox and how does it work? #
Originally introduced with Windows 10 update 1903, Windows Sandbox is a native feature designed for computer security. Currently, it is supported exclusively on Pro, Enterprise and Education editions. If you use the Home version, your operating system will not support it natively, but you can evaluate a license update by consulting the official Microsoft specifications on Windows editions. There are also third-party software for sandboxing, but the native solution remains the safest and most efficient.
This feature leverages hardware virtualization technology, based on the same infrastructure that manages virtual machines (VM) through Hyper-V. The goal is to create a temporary and completely isolated desktop environment in which to run suspicious files, open doubt attachments or test applications in development, without any risk of compromising the host operating system.
Unlike a traditional virtual machine, activation of Windows Sandbox does not require downloading an ISO image or creating a virtual hard disk (VHD). The system automatically generates a clean replica of the Windows version in use. When the application is closed, all data, files downloaded and changes made are permanently deleted. It is an extremely fast and safe approach, documented extensively in the technical documentation of Windows Sandbox, ideal for those seeking protection without complex configurations.
System requirements to enable Windows Sandbox #
Before proceeding with the installation, it is essential to verify that your computer meets the necessary hardware requirements. The processor must support virtualization (AMD-V or Intel VT-x) and this option must be enabled at BIOS/UEFI level. Here’s how to control the status of your PC:
- Right-click the Start menu icon (or press the Windows + X combination on the keyboard), then select Terminal ( Administrator) from the menu. In the younger versions of Windows 11, this item could be called Windows PowerShell ( Administrator).
- Inside the Terminal window, type the systeminfo.exe command and press Enter.
- Scorri i risultati fino a individuare la sezione Requisiti di Hyper-V. Assicurati che tutti i parametri indicati, in particolare la virtualizzazione, riportino il valore Sì.
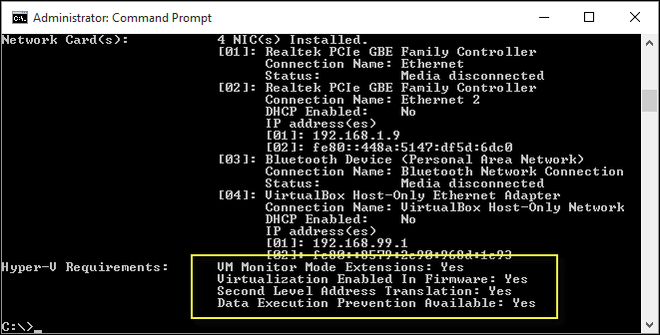
- If the firmware enabled Virtualization parameter reports the No value, you will need to restart the computer, access the motherboard settings (BIOS or UEFI) and manually enable the virtualization feature of CPU.

How to install and configure Windows Sandbox on Windows 11 #
Once hardware requirements have been confirmed, the activation of Windows Sandbox requires very few steps through the integrated operating system tools. Follow this wizard:
- Open the Start menu, type optionalfeatures.exe in the search bar and press Enter to open the Windows Features window.
- Scorri l’elenco delle funzionalità opzionali fino a individuare la voce Sandbox di Windows (o Windows Sandbox in base alla lingua del sistema). Spunta la casella corrispondente.
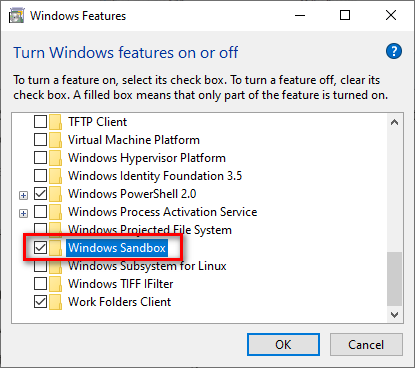
- Click OK. The system will look for and install the necessary components. At the end of the operation, click Restart now when required to permanently apply the changes.
- After restarting, open the Start menu again, search for the Windows Sandbox application and click on its icon to start it.
- At this point, the isolated virtual environment will open in a new window. The installation is successfully completed: now you can copy files from your computer and paste them directly into the Sandbox to start them safely.

Now that the environment is configured and operational, remember that every time you close the application, all data within it will be completely destroyed. For more details on integrated system defenses and best practices, please consult the Microsoft official corporate security portal.
Frequently Asked Questions (FAQ) about Windows Sandbox #
Windows Sandbox slows computer performance? #
No, Windows Sandbox is designed to be extremely lightweight and optimized. Being an ephemeral virtual environment, it uses system resources (such as CPU and RAM memory) exclusively when the application is open and actively running. Once the window is closed, all allocated resources are immediately released and returned to the main operating system.
Can I recover files saved after closing Windows Sandbox? #
Absolutely not. The main safety feature of Windows Sandbox is its temporary and non-persistent nature. At the exact moment when you close the application, the entire virtual environment is permanently destroyed. This includes any downloaded file, created document or software installed within the Sandbox.
Why don’t I find “Windows Sandbox” among the optional features of my PC? #
If you can’t see the option in the Windows feature list, the most common reason is the use of the Windows 11 Home edition, which does not natively support this company-level tool. In addition, the item may not be available or selectable if hardware virtualization is not supported by the processor or if it has not previously enabled in the BIOS/UEFI of the computer.