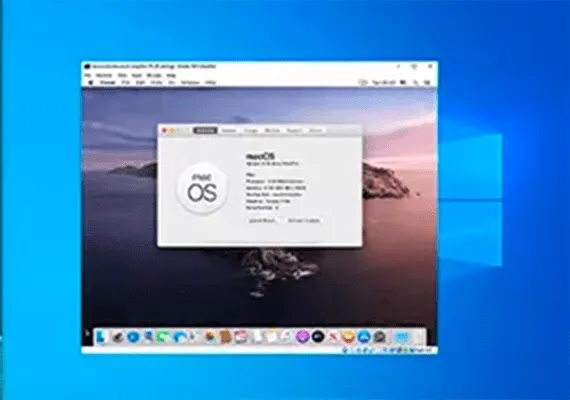
Would you like to try the Apple operating environment without having to buy a new computer? In this detailed guide I will explain how emulating macOS on Windows using VirtualBox, one of the most reliable software for creating and managing virtual machines.
Download required: Tools and Files
Before entering the configuration, it is essential to download and install the essential tools. This tutorial will show you step by step how to set up a macOS virtual machine relying on Oracle VM VirtualBox Manager.
You will also need a disk image of the operating system. In this guide we will focus on macOS Catalina. You can find the files you need for emulation in the next section, but we always invite you to consult the hardware specifications on apple official website.
This procedure has been tested specifically for installing macOS in a virtualized environment running on Intel hardware architecture.
Virtual Machine Preparation and Creation
Start downloading the latest version of VirtualBox from Oracle official website. For this tutorial we used version 6.1.4, but the steps remain valid for the latest configurations.
Download the Virtual Image of macOS
Use the link provided below to download the disk image of macOS Catalina, already prepared to be correctly recognized by virtualization software.
Please note: If the Google Drive server should report reaching the download limit, right-click the file and select “Copy” to transfer it to your personal drive. From there, you can proceed with the download without restrictions.
Download macOS Catalina Virtual Machine Images (Password for the archive: Geekrar.com).
After downloading the archive, right-click and extract the file using a reliable decompression software. For example, you can use 7-Zip: right-click the file, select 7-Zip > Estrai in “macOS Catalina”.
Installation of the VirtualBox Extension Pack
To ensure the proper functioning of essential peripherals, it is mandatory to install the official extension package. This add-on integrates support for USB 3.0 ports, mouse and keyboard optimization and other key system patches.
Download the component from here: VirtualBox Extension Pack for Windows.
Scroll down the web page, select “All supported platforms” to download it, then double-click the file to start the automatic installation within the program.
Virtual Machine Initial Configuration
Start VirtualBox, click the button New and type “macOS” in the name field.
The software will automatically detect the operating system based on the inserted text, setting the default version on “Mac OS X”. Leave the suggested parameters as they are.
Choose a simple and easy to remember name for your virtual machine (for example macoscat). Next, you will need to type this name within some command strings: avoiding complex spaces or names will greatly facilitate the procedure.
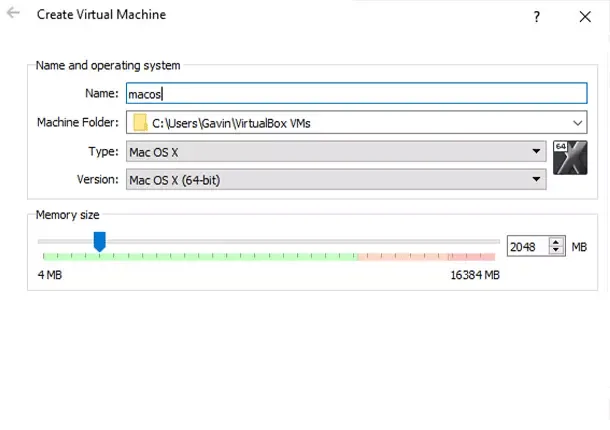
At this point, define the amount of RAM to allocate to the virtual machine. I suggest you assign a minimum of 4 GB (4096 MB) to ensure stability, but if your host computer has a lot of memory available, increase this value will dramatically improve system fluidity.
Caution: Never assign more than half of the total RAM available on your host PC, since Windows needs sufficient memory to continue working in the background without abnormal crashes.
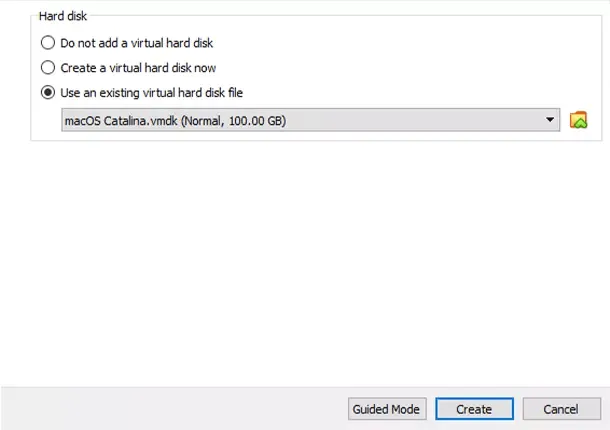
Now is the time to connect the hard drive. Select the option Use an existing virtual hard disk file, click the folder icon and search for the file in VMDK format extracted earlier. Finally, press on Create.
Edit Advanced Settings
Stop: do not start the virtual machine yet! To avoid errors kernel panic, it is imperative to optimize some advanced settings. Right-click the macOS virtual machine and select Settings.
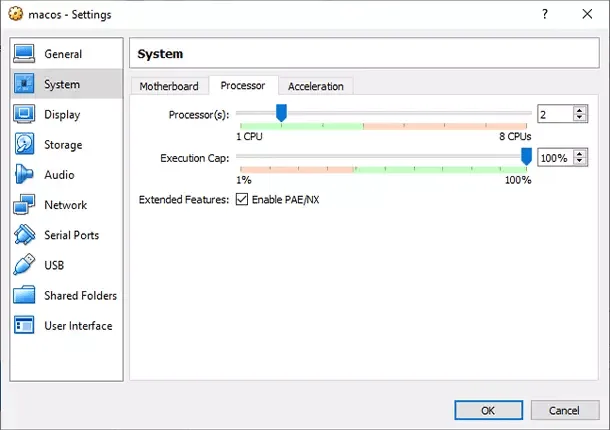
Move to section System, remove the check from “Floppy” in the start order to disable it and make sure that the chipset drop-down menu is strictly set to ICH9.
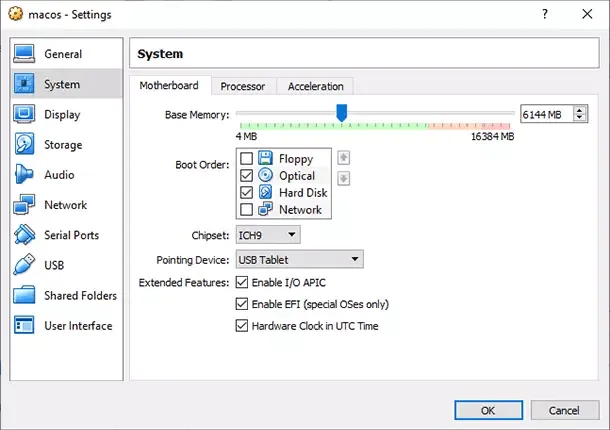
Always in the System screen, select the tab Processor. Assign at least two logical cores to the virtual machine. If you have a high-end CPU (like a processor Intel Core i7 or i9), you can consider four or more assignments to maximize overall performance.
Before switching to another menu, make sure the option PAE/NX Enable it's gone.
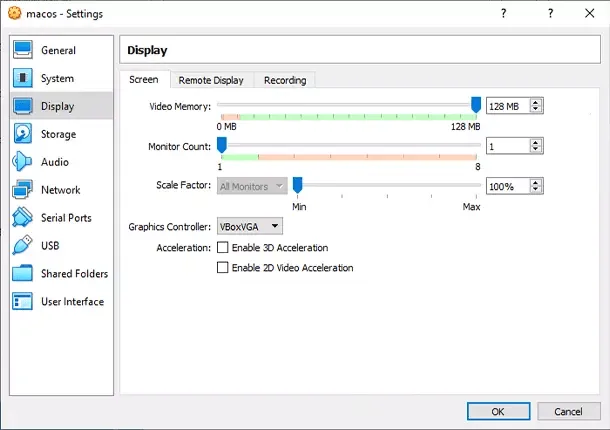
Go to section Screening (or Display) and set the slider of Memory video maximum allowed, or 128 MB.
Register now in section Archives and select the box next to Use I/O host cache associated with the data controller.
As the last essential step, go to the tab USB, select the option USB 3.0 controller (xHCI) to ensure rapid data transfer with external peripherals, then click on OK to save.
VirtualBox Patch through Command Prompt
Although the virtual environment has been configured, VirtualBox is not structured to process an Apple installation file natively. You need to apply a patch to allow the software to work properly with the VMDK file.
To do this, you must inject some directives using the host operating system command line. Pay close attention to the following details.
Start closing VirtualBox completely. The commands will not be executed and will return a process error if the program or one of its associated services are still running in the background.
Press the key combination Windows + X on the keyboard, then select Command Prompt (Administrator) from the context menu.
If your menu shows only the PowerShell or Terminal option, open the Start menu, type “cmd” in the search bar. Then right-click the Command Prompt icon and choose Run as administrator.
The underlying patching procedure is compatible with both the VirtualBox 5.x and the latest 6.x series.
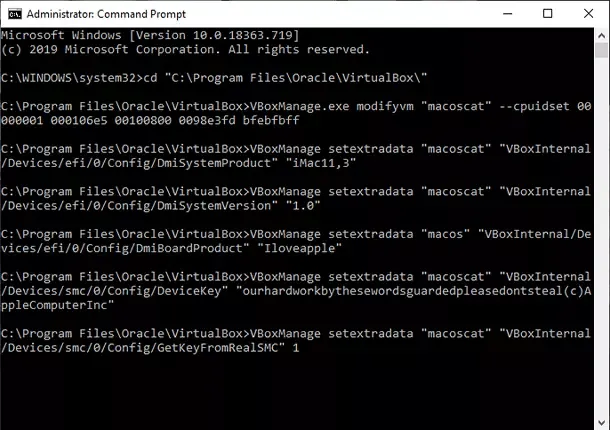
Use the following command to place you inside the Oracle VirtualBox installation directory:
cd "C:\Program Files\Oracle\VirtualBox\"
Now, copy and paste the following command lines, once at a time, pressing Enter at the end of each. Attention: make sure to replace the “macoscat” word with the exact name you assigned to your virtual machine. Here are the necessary scripts:
VBoxManage.exe modifyvm "macoscat" --cpuidset 00000001 000106e5 00100800 0098e3fd bfebfbff
VBoxManage setextradata "macoscat" "VBoxInternal/Devices/efi/0/Config/DmiSystemProduct" "iMac11,3"
VBoxManage setextradata "macoscat" "VBoxInternal/Devices/efi/0/Config/DmiSystemVersion" "1.0"
VBoxManage setextradata "macoscat" "VBoxInternal/Devices/efi/0/Config/DmiBoardProduct" "Iloveapple"
VBoxManage setextradata "macoscat" "VBoxInternal/Devices/smc/0/Config/DeviceKey" "ourhardworkbythesewordsguardedpleasedontsteal(c)AppleComputerInc"
VBoxManage setextradata "macoscat" "VBoxInternal/Devices/smc/0/Config/GetKeyFromRealSMC" 1
After completing the insertion of all code lines (and assuming that the terminal has not returned error messages), you can safely close the Command Prompt window.
First Start and Installation of macOS
Open VirtualBox. Double-click the macOS virtual machine (or select it and press “Start”) to turn it on. Initially you will see a dense series of diagnostic information texts, followed shortly by a gray screen.
The gray loading screen may take a few minutes to be overcome: do not alarm yourself, it is a completely physiological behavior. Once you complete the processing, the interface will load and you will present the welcome and configuration screen macOS Catalina.
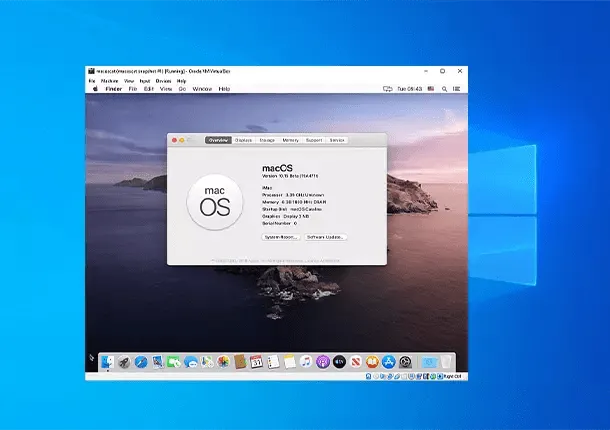
From this point on, the user interface will guide you in the configuration of time zone, keyboard layout and personal account, similar to the first ignition of a real Apple computer.
Pro tip: as soon as the grey screen is passed, I highly recommend you take a snapshot (snapshot) of your virtual machine. This way, if something goes wrong during the installation, you can restore the rescue and restart the process without having to run all the command lines again.
Once you have arrived on the main desktop, do a rescue again to preserve a clean installation of the operating system. To do so, go to the top menu of VirtualBox and select Machine > Instant shot, assign a clear name to your backup and wait for it to be processed.
Frequently Asked Questions (FAQ) on macOS emulation
Is it legal to emulate macOS on a Windows PC?
THEEULA (End User License Agreement) by Apple strictly specifies that the macOS operating system is licensed to be installed and used exclusively on Apple branded machinery. MacOS emulation on non-Apple hardware (such as common Windows PCs) is a violation of the conditions of use and is generally tolerated only in laboratory environments for purposes of computer testing and private teaching.
What are the minimum system requirements to smoothly spin virtualized macOS?
To avoid slowdowns and a compromised user experience, it is recommended to have a computer equipped with an Intel processor or a modern multi-core AMD, a minimum of 8 GB of total RAM (in order to be able to allocate at least 4 GB to the virtual machine without blocking Windows) and installation on a fast SSD drive with at least 50 GB of free space.
Why is the graphical interface of the virtual machine slow or snap?
The main limit of emulation via VirtualBox is the absence of native support for hardware acceleration of the video card. macOS relies heavily on the “Metal” graphic engine, which cannot be fully replicated in virtualized environments. Make sure you have assigned the 128 MB maximum video memory and an adequate number of processor cores is the best practice to mitigate visual delay.


