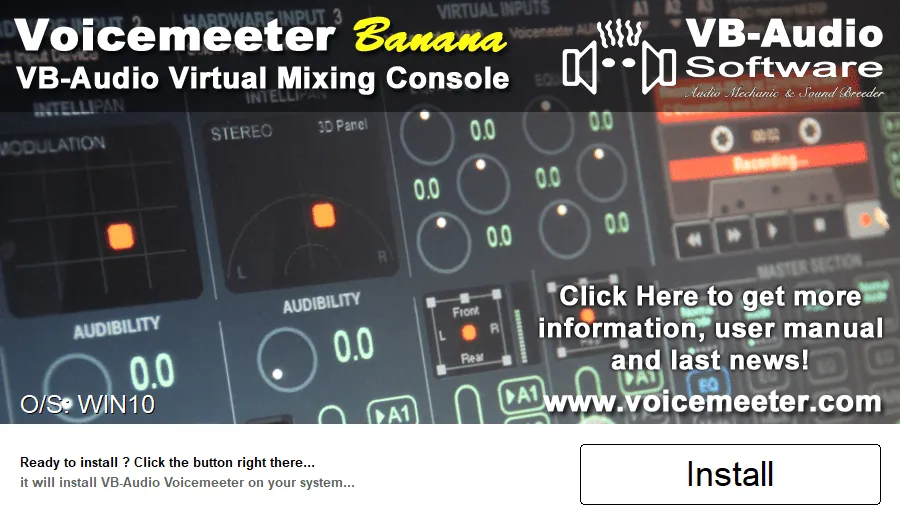
Voicemeeter Banana is an extremely powerful virtual audio mixer for Windows, equipped with a wide range of advanced functions for sound management. However, the rich interface of options can disorient a user to the first weapons. This complete guide will accompany you step by step in the installation, configuration and optimization of Voicemeeter Banana, allowing you to manage your audio setup as a real professional.
Installation and Download
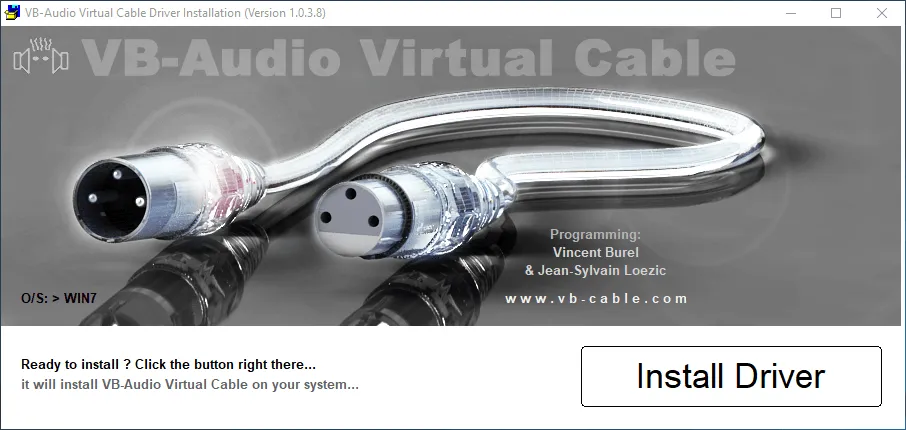
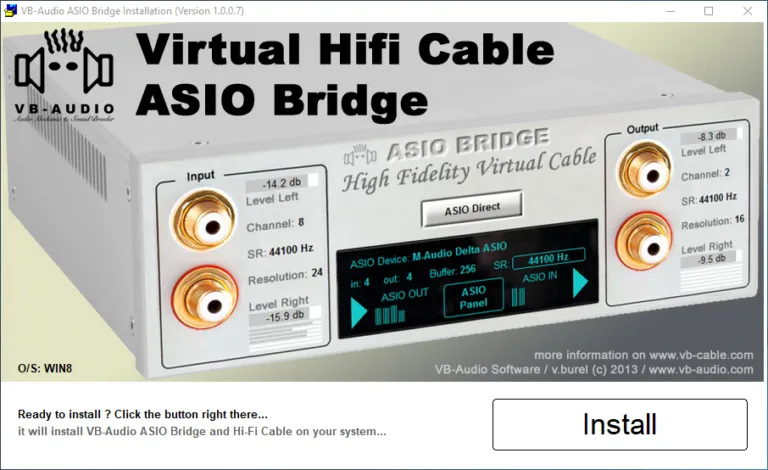
To maximize the potential of the software, it is recommended to install virtual drivers simultaneously VB-Audio Cable and VB-Audio Hi-Fi Cable, developed by the same manufacturer. These virtual cables allow you to route complex audio signals through the mixer console. If you have a dedicated audio interface, you can integrate it perfectly, as Voicemeeter Banana natively supports drivers ASIO (Audio Stream Input/Output). The main software Voicemeeter Banana, as well as additional components VB-Audio Cable and VB-Audio Hi-Fi Cable, can be downloaded free of charge from the manufacturer's official website. The Hi-Fi cable is located on the same standard cable download page, scrolling down.
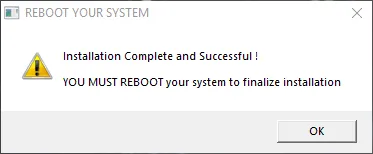
If your setup requires more than 3 inputs and outputs provided by Voicemeeter Banana, you can opt for the top version. Voicemeeter Potato offers 5 inputs and outputs, plus an additional virtual input and advanced creator functionality. However, the basic mechanics remain identical. Attention: after completing the installation of audio drivers, it is absolutely essential to restart the Windows operating system to correctly apply changes to the registry.
Configuration of Voicemeeter Banana
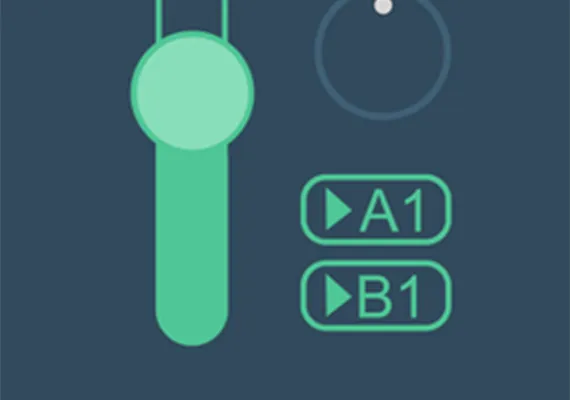
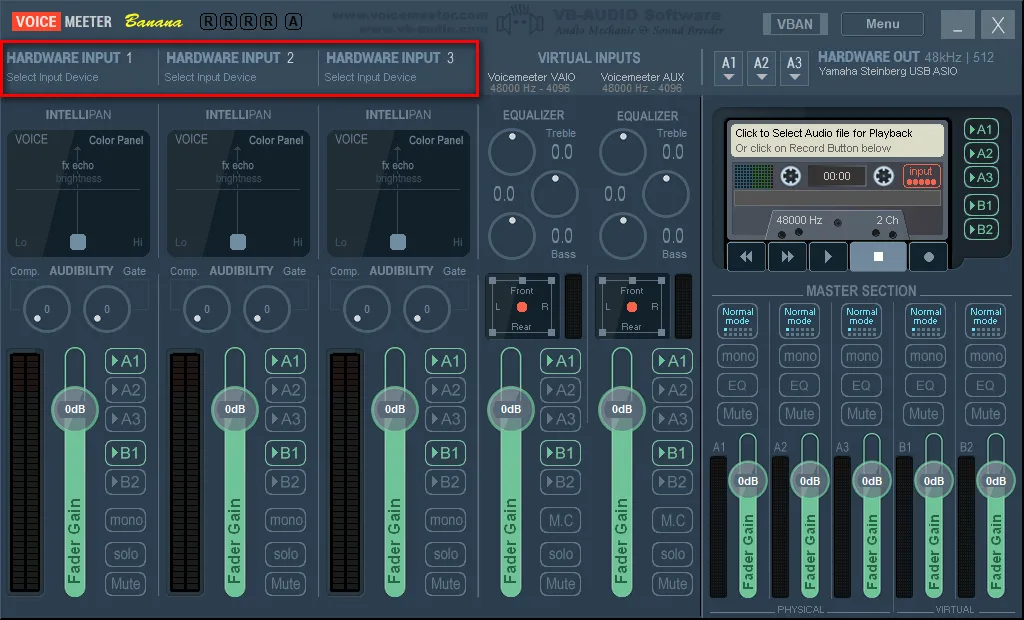
After rebooting the PC, start Voicemeeter Banana for the first time. The user interface will be presented with a technical design inspired by true studio consoles. The first element that will capture your attention will be a flashing red in the upper right corner: “Select Main Output Device (A1)”. This indicates that the software needs a reference output to start the audio engine.
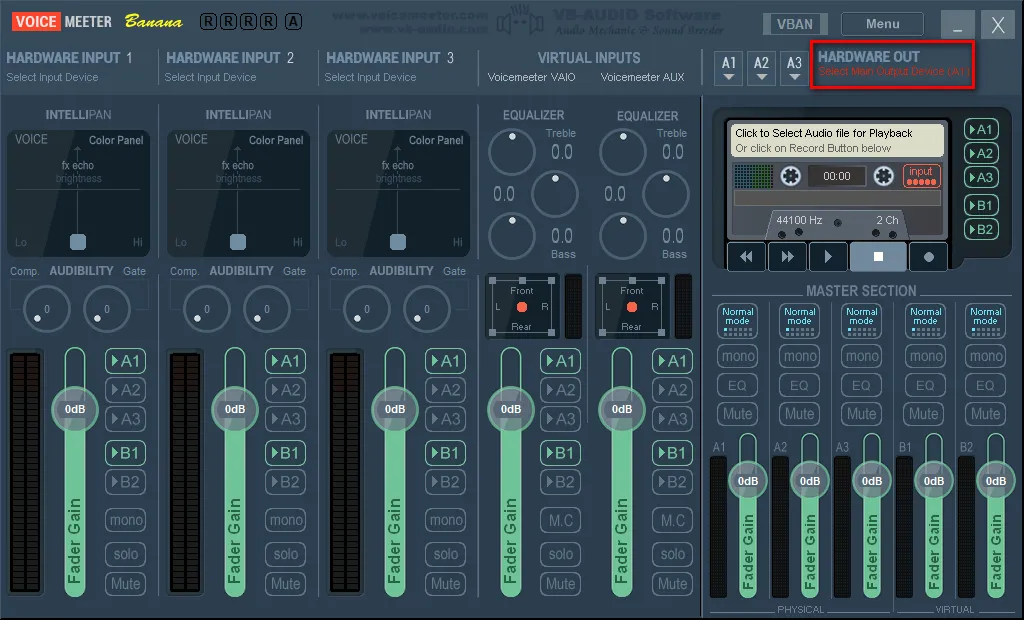
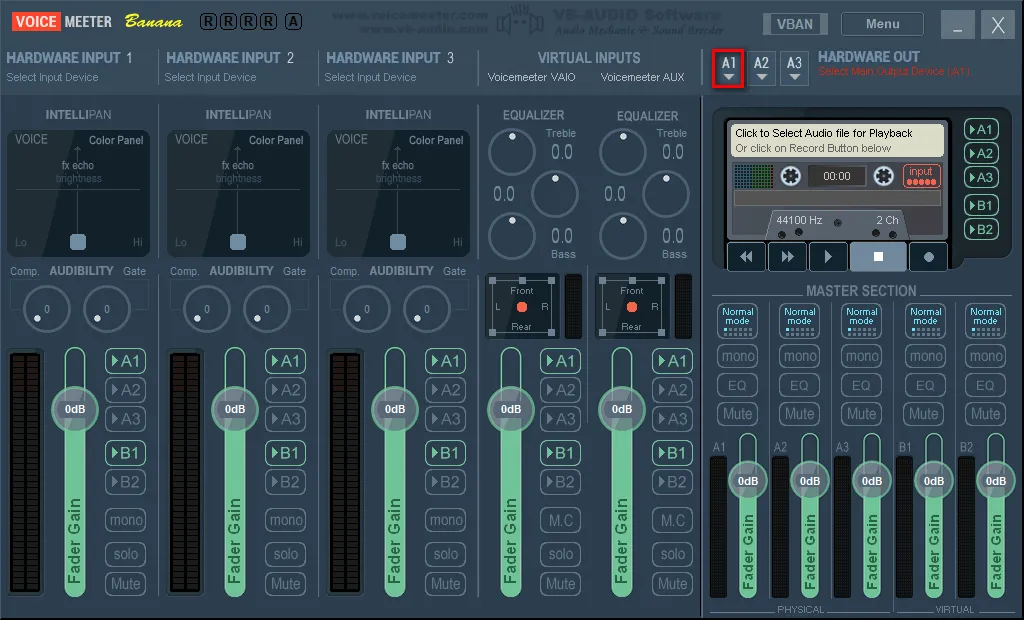
The first fundamental step is the assignment ofexit A1, which usually corresponds to your main speakers or headphones. Click the A1 button next to the flashing text and select the desired hardware from the drop-down menu. The system allows you to use up to 3 physical outputs simultaneously (A1, A2, A3), allowing you, for example, to send the music track to the headphones and system sounds to the speakers. With the Voicemeeter Potato version, the independent outputs are up to 5.
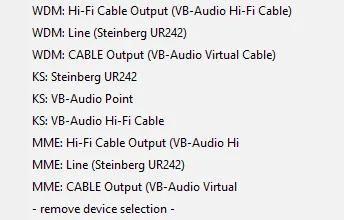
In the output selection menu you will see different audio communication interfaces for Windows: WDM, KS, MME and, where supported, ASIO. If you have a dedicated audio card with native ASIO drivers, select it without hesitation. In the absence of this protocol, architecture WDM (Windows Driver Model) or KS (Kernel Streaming) is the most optimized choice.
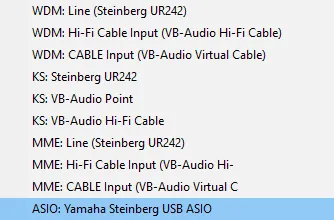
The MME protocol (Multimedia Extensions) should only be selected as a last extreme resource in case of incompatibility, as it generates a considerable delay. The primary objective of a virtual audio setup is maintain the lowest latency possible: ASIO guarantees maximum performance, followed by KS and WDM wheel, while MME closes the ranking and is often inappropriate for real-time monitoring.
Once the output is assigned, the audio engine will be activated requiring a few seconds of initialization. As a preventive measure to avoid hiring audio returns (Larsen effect), we suggest that you immediately turn off the “A1” and “B1” green buttons on the various channels, especially in anticipation of the microphone connection.

We now proceed with the addition of hardware inputs, placed on the top left of the mixer (“Hardware Input 1”, “Hardware Input 2” and “Hardware Input 3”). In this section you can insert your microphone and route signals from installed virtual cables (VB-Audio Cable and VB-Audio Hi-Fi Cable).
By clicking on the input header, you will unfold a drop-down menu that lists all operating system registration peripherals. As with outputs, choose the WDM or KS interface for stability. A useful trick for the organization: by right-clicking on the track name, you can rename it freely (e.g. “Microphone Principal”).
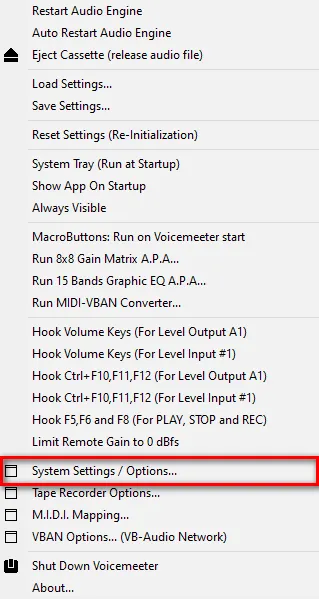
To maximize performance, click on “Menu” at the top right and access “System Settings / Options” (System Settings / Options). The advanced control panel will open. Below, under the heading “Preferred Main SampleRate”, set the sample rate (Sample Rate) desired. In the vast majority of web and gaming uses, 44100 Hz or 48000 Hz are the reference standards. The golden rule is the uniformity: if your microphone natively supports 48000 Hz in Windows, it sets this value everywhere in Voicemeeter to prevent heavy CPU resampling.
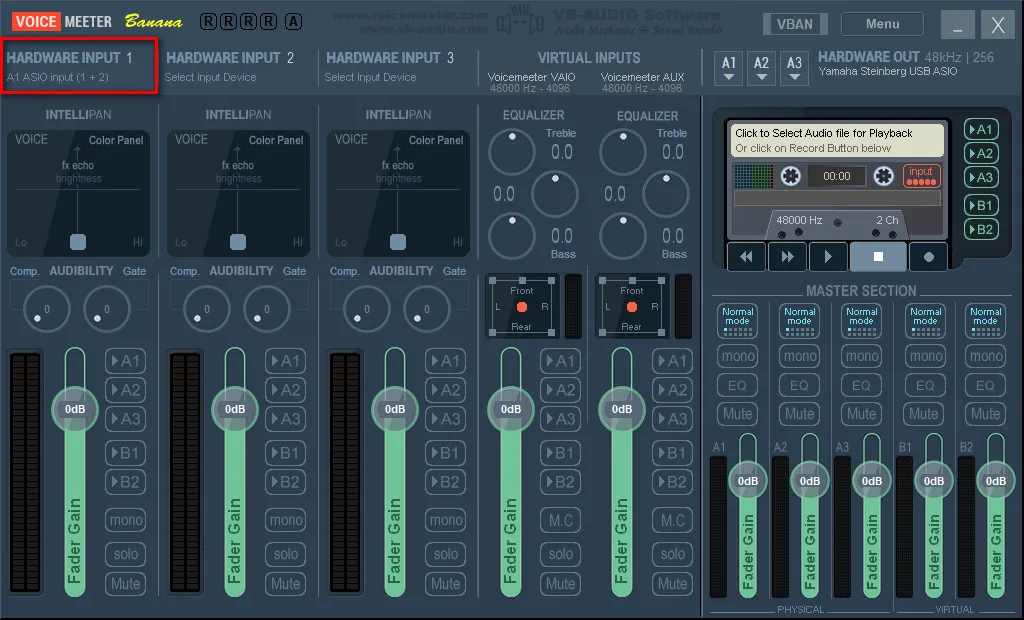
If you use a ASIO professional audio interface, you can route the physical inputs of the card directly into the mixer channels using the “Patch ASIO Inputs to Strips” section. Assigning inputs 1 and 2 of the board to the “Hardware Input 1′′′′ Voicemeeter, the channel will receive a pure zero latency signal. Just make sure that the hardware input selected on the mixer is not already receiving WDM audio, avoiding assignment conflicts.
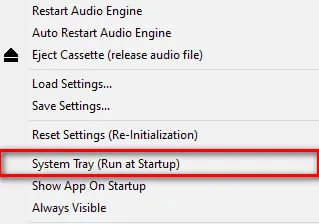
In order for the entire sound stream of the computer to be managed by the newly created console, Voicemeeter must be elected to the default audio device within Windows. This concept of the “virtual microphone” is the key to routing. Before proceeding, we automatically start the program: click on “Menu” and select the item “System Tray (Run at Startup)”.
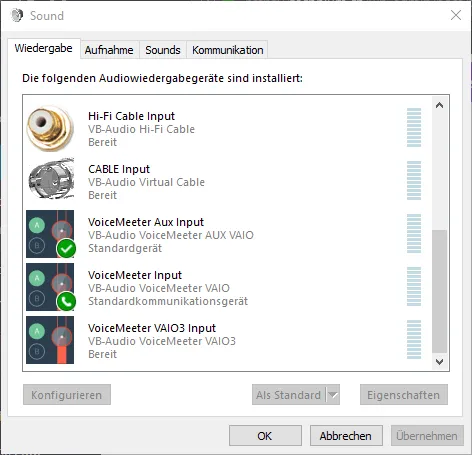
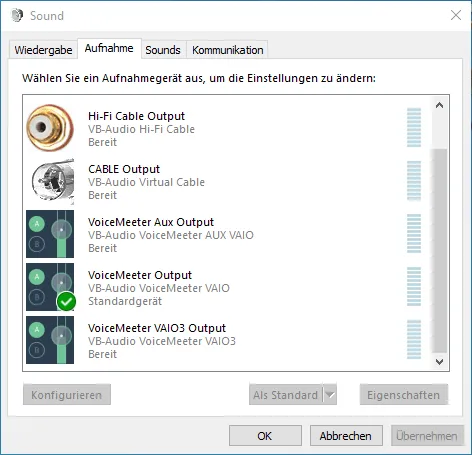
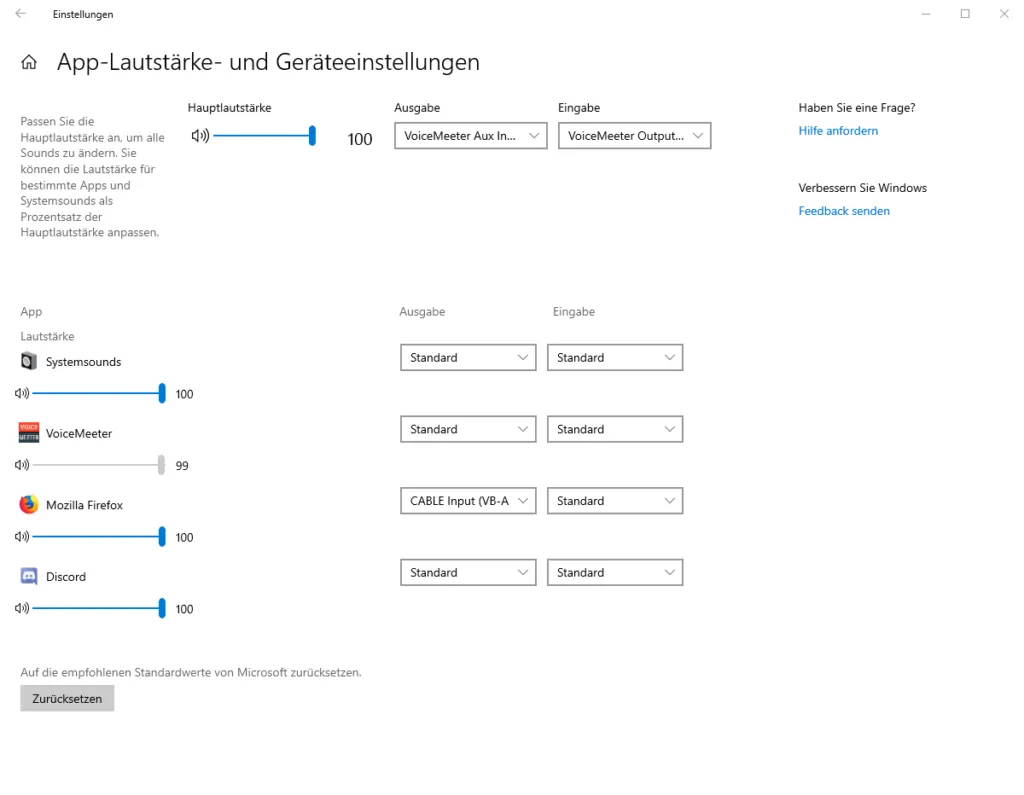
Right-click the speaker icon in the Windows application bar, select “Open Audio Settings” and continue on “audio Control Panel”. In the Play tab, right-click to set “VoiceMeeter Aux Input” as default system device and “VoiceMeeter Input” as a default communication device. Move later to the Registration tab, setting “VoiceMeeter Output” as a default device for both functions.
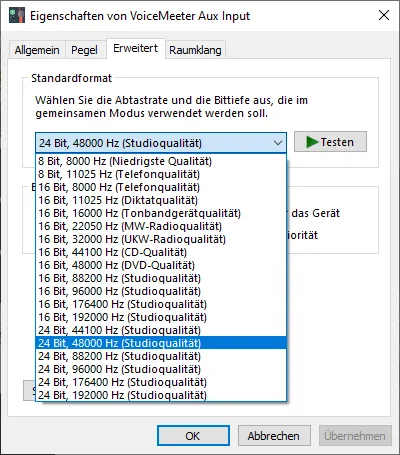
A crucial step to avoid digital cracking (audio crackling) is to verify that the sampling rate and bit depth are homogeneous on all peripherals. Right-click on each device in the Control Panel, choose “Properties” and go to the “Advanced” tab. This operation must be performed for speakers, microphones and, of course, Voicemeeter and VB-Cable virtual peripherals.
To perfectly synchronize the drivers, close Voicemeeter temporarily (Menu -> Shut Down Voicemeeter). Open Windows File Explorer, navigate to installation directories and run the following files. EXE as Administrator (usually located in these default paths):
C:\Programmi (x86)\VB\Voicemeeter\VBCABLE_ControlPanel.exe
C:\Programmi (x86)\VB\Voicemeeter\VBVMAUX_ControlPanel.exe
C:\Programmi\VB\CABLE\VB-AUDIO Virtual Cable Control Panel.exe
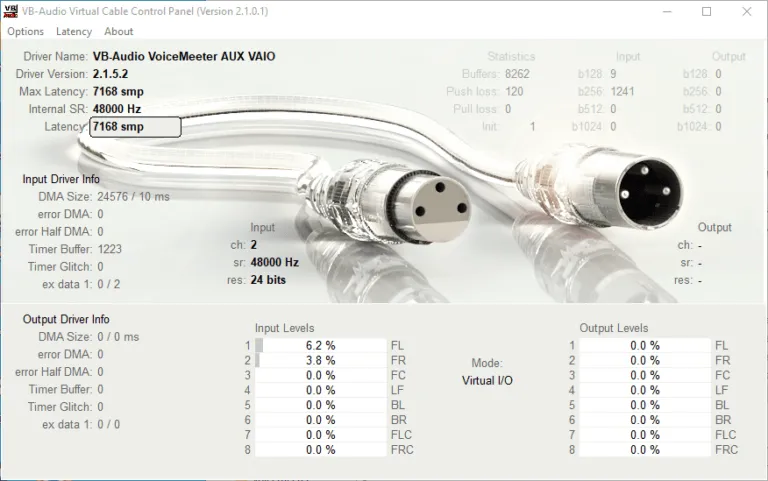
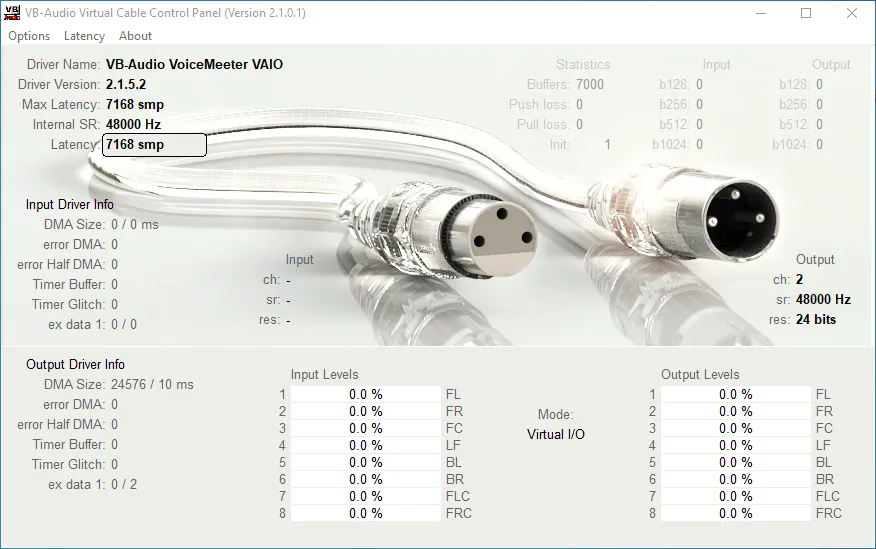
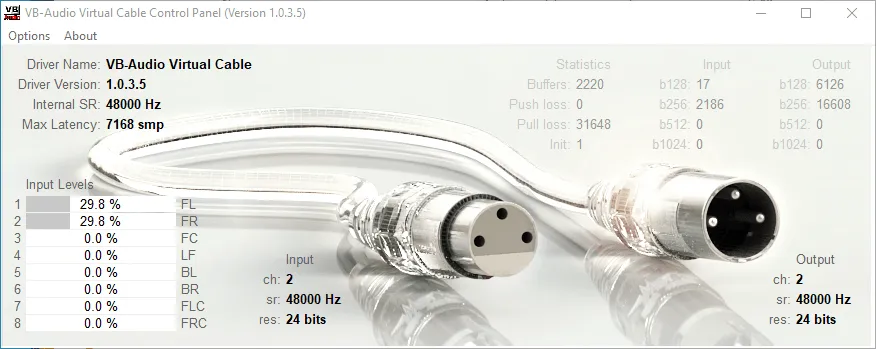
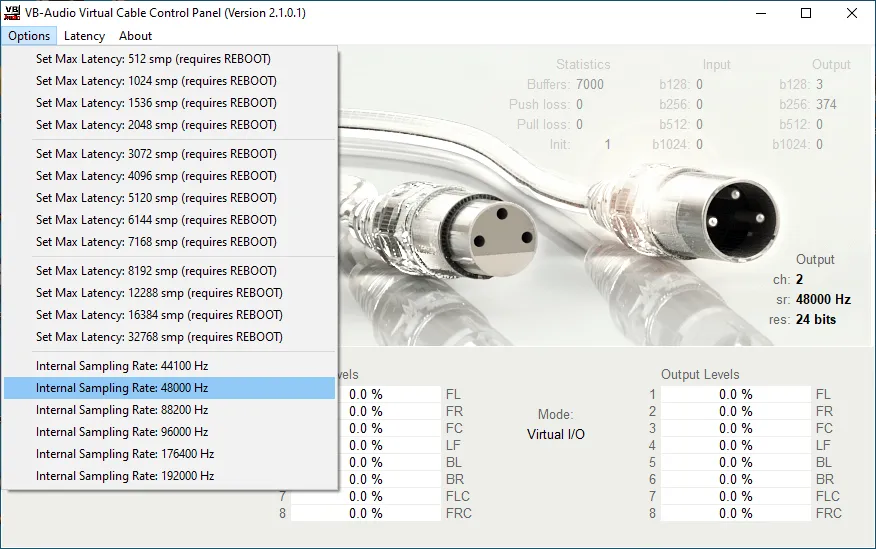
Within these control panels, make sure that the “Sample Rate” item is identical in each section (Internal, Input, Output), aligning it with the previously established values.
If you opted for Voicemeeter Potato, the verification will also include this panel:
C:\Programmi (x86)\VB\VoicemeeterVBVMVAIO3_ControlPanel.exe
Expert users can use these panels to surgically calibrate latency (“Max Latency”). Consolidated make-up is to make a music track play through the virtual cable and monitor error statistics. It identifies the maximum statistical value before the error (e.g. 512) and multiplies it by 3, thus setting the latency to 1536 smp, thus obtaining a stable and lag-free flow.
Please note that the CPU load can change these parameters over time. If you encounter problems with the VB-Audio Hi-Fi Cable, latency can be further managed through the appropriate ASIOBridge interface, located in the path C:\Programmi (x86)\VB\ASIOBridge\VBCABLE_AsioBridge.exe. After this meticulous optimization, complete computer reboot to consolidate sound architecture.
Basic functions of Voicemeeter Banana
At the end of the last reboot, start the program again. Now we will analyze real activity on the field: how to direct signals via bus (A and B), use the Intellipan for voice processing and eliminate background noise through the Noise Gate.
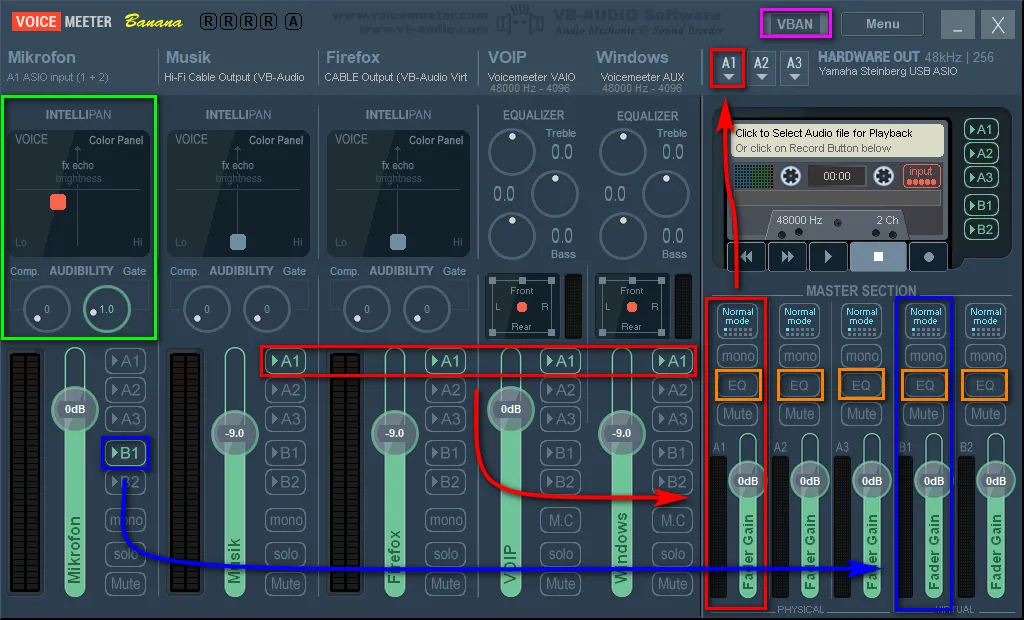
Since we have elected “VoiceMeeter Aux Input” as Windows default, the entire multimedia stream (Chrome, Spotify, Video Games) will automatically pour into the column “Voicemeeter AUX” (marked in the image as Windows). On the contrary, incoming calls from software as Discord, Skype or Steam will be hijacked on the column “Voicemeeter VAIO” (marked as VOIP), as this is our default communication device.
Quick guide to main controls:
Red Box (Bus A): Whenever you light the “A1” button on a specific track, you are authorizing it to send it to the physical hardware output (e.g. speakers or headphones connected). In my setup, I listen simultaneously to cable routing music, system sounds (AUX) and the voices of my companions (VAIO), sending the sound package combined with the Steinberg interface.
Blue Box (Bus B): The activation of the “B1” button routes the signal to the virtual output (“Voicemeeter Output” in Windows), which represents what streaming software or friends in chat will listen. In addition to sending your microphone (Bus B1 active), you could also activate the B1 on the Firefox track to let you listen to a YouTube video in the background to your lobby on Discord.
Green Box (Intellipan): This versatile graphic pane placed above the input channels serves to model the voice. The two side cursor controls manage the Noise Gate and the Compressor. The Gate softens the microphone when you are silent (hiding the noise of the keys or fans). The compressor reduces the dynamic hike: raise your whispers and lower your screams. Use the compressor with extreme caution to not distort the timbre of the voice.
To sculpt the tones, move the orange cursor inside the square (“Voice Color Panel”) emphasizing the bass or shine. To calibrate these effects, we recommend that you temporarily activate the “A1” button in the microphone to listen to the results of your intervention in the headset. Important: strictly wears headphones at this stage to thwart annoying environmental echoes. A right click on the Intellipan will reveal additional features such as the “Modulation FX” ( Robotic Voice Effects) and the “3D Position”. A double left click will cancel any changes by bringing the cursor back to the center.
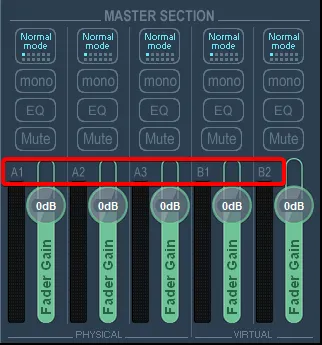
Orange Box (Master EQ): Right-clicking the band highlighted in the Master section, you will launch a very powerful parametric equalizer with 6 bands. It is a vital tool to correct acoustic flaws of your headphones or studio monitors. The simple left click activates and deactivates the equalization curve (bypass).

Pane Viola ( VBAN networks): The VBAN button opens audio networking ports. This technology transmits sound streams without loss of quality to other devices in the same home network, or even on the Internet (via port forwarding on the router). It is the main tool for those who work in configuration Dual-PC Streaming (e.g. using OBS Studio on the secondary PC) completely replacing the expensive physical acquisition cards. We will approach the VBAN setup in the next paragraph.
Now you just have to physically separate the most stubborn programs. Apps like Firefox or Google Chrome do not allow you to select the audio output within them. To domarle, click on the Windows speaker icon, access “Open Audio Settings”, scroll to “Advanced Audio Options” and click on “App Volume and Device Preferences”. From this window, you can turn the browser flow to a virtual cable, for example by selecting “CABLE Input (VB-Audio Virtual Cable)”.
The apotheosis of the mixer is reached in the balancing phase (mixing): if the gameplay covers the voices of your interlocutors (VOIP column), simply lowers the volume cursor (Fader) of the game track. You can operate with the mouse or right-click the Fader to enter the numerical value in exact decibels. Always respect the golden rule of gain staging: lower the noisy sources rather than raise the weak ones, thus avoiding sending in distortion (clipping) the Master level.
These foundations will guarantee you complete control of the audio mixer. Experience and assimilate the logic of routing (Bus A and Bus B) to quickly master the console.
Other Advanced and Useful Functions
Control through Keyboard Multimedia Keys:
Using the appropriate general drop-down menu, enabling the voice “Hook Volume Keys (For Level Output A1)”, you can manage the general volume of the Master A1 output using the physical volume buttons on your keyboard. To avoid hearing damage due to accidental maneuvers, make sure to flag “Limit Remote Gain to 0dbfs”, which will prevent the volume from crossing the distortion threshold of digital zero.
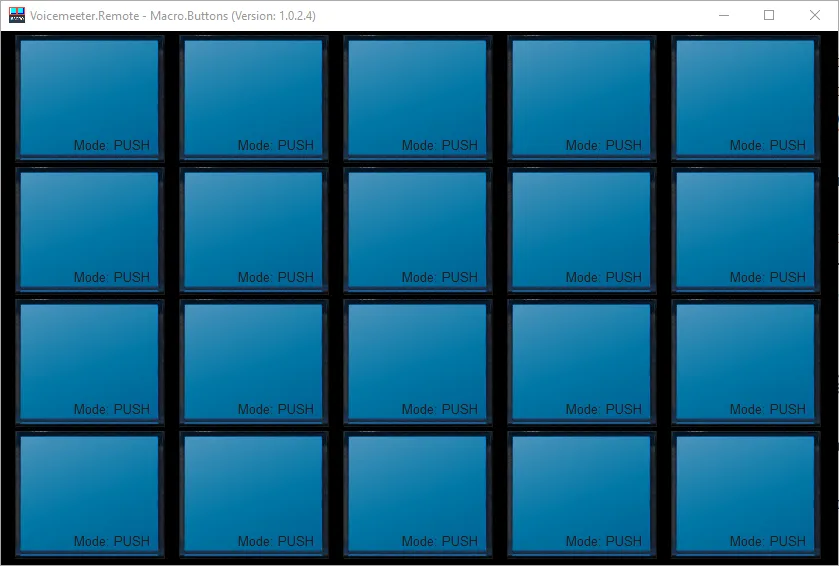
Using Macro Buttons:
The ecosystem includes a powerful additional application that can be recalled by activating the option “Macro Buttons: Run on Voicemeeter Start”. This utility allows you to map complex commands on individual keyboard shortcuts (Hotkeys) or MIDI controllers. It is the perfect tool to set up a virtual Soundboard or to recall fast muting scenarios while streaming. Given the high level of programming required, it is highly recommended to consult the exhaustive documentation on the VB-Audio official forum to discover all scripting combinations.
Configuration of the VBAN protocol (Streaming Dual-PC):
Activation of the VBAN network protocol requires cross-linking of IP addresses between the source computer (sender) and the receiving computer (destinator). Both terminals must necessarily run an active instance of Voicemeeter Banana and activate the functionality from the VBAN button on the top left.

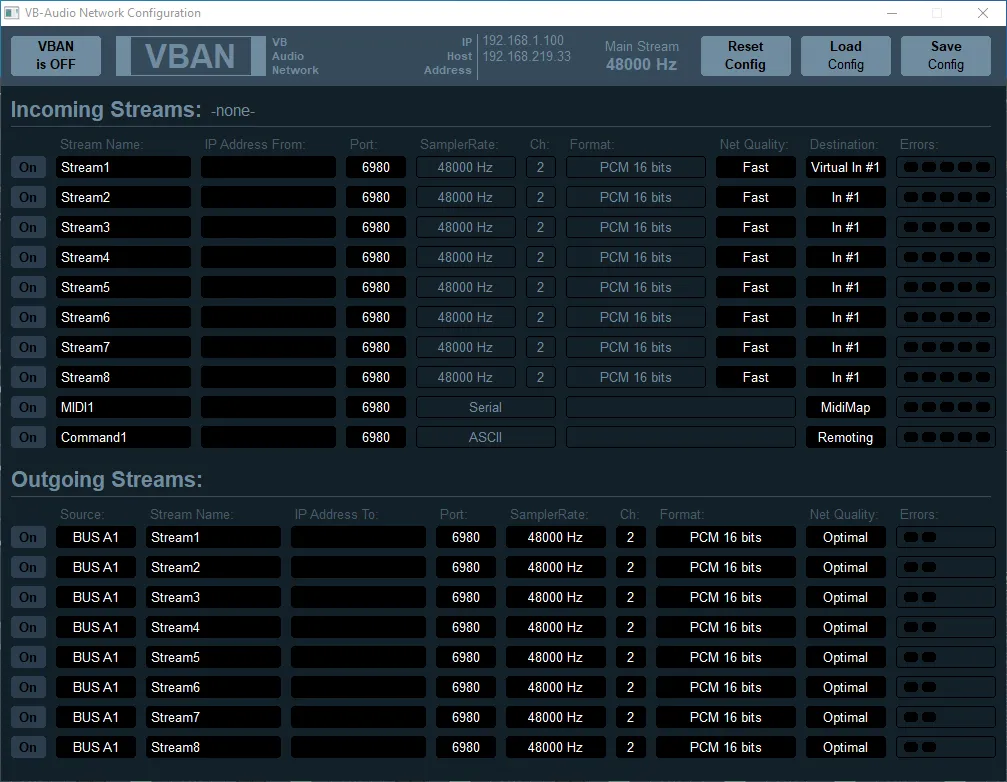
You can find the local IP address (IPv4) of the PC by analyzing the central top of the VBAN panel (red square).
Start by setting the output stream from the source computer by interacting with the “Outgoing Streams” section (Outgoing Streams):
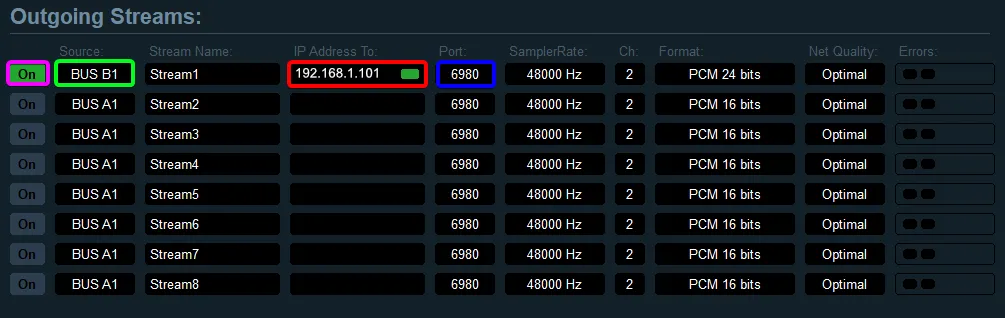
Green Box (Source): Select the master bus for transmission. You can choose from Master A1, A2, A3 or virtual B1, B2. In the example, the channel B1 was selected to send the microphone capture to the network.
Red Box (Destination): Type the IP address of the receiving PC. If the purpose is to transmit audio to an external user via the Internet, you will need to enter the public IP address provided by the counterparty’s ISP. To circumvent the limits of dynamic IPs, we strongly suggest the adoption of a DynDNS-style service provider.
Blue Panel (Network Door): The default UDP communication port is 6980. As long as the transmission is limited to the home walls (local LAN network), the configuration does not require any intervention on the router.
Move now to the receiving computer to intercept the signal by configuring the “Incoming Streams” section:
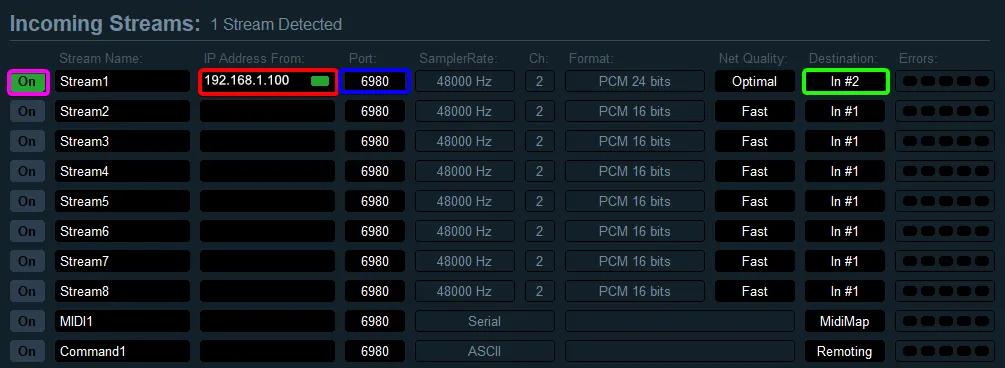
Red square (Mittente): Type the IP address of the first PC (source). If the flow passes through the Internet, the public IP address of the transmitter will be required.
Blue Panel (Network Door): The entry door is also on the 6980 value. If the communication happens on the Internet, you are obliged to set the Port Forwarding within the administration interface of your router, channeling UDP 6980 packets to the internal IP address of the receiving PC.
Green Box (Assegnation): Set in which strip of the virtual mixer receive the sound received (“Hardware Input 1”, “Hardware Input 2”, “Hardware Input 3”, “Voicemeeter VAIO” or “Voicemeeter AUX”). In the example, the “Hardware Input 2” was occupied, overwriting the hardware input previously mapped to that column.

Pane Viola (State): Activate the side button on the ON word to “light” the incoming flow.
The VBAN tunnel has been successfully established and the uncompressed PCM audio stream is exchanged in real time.
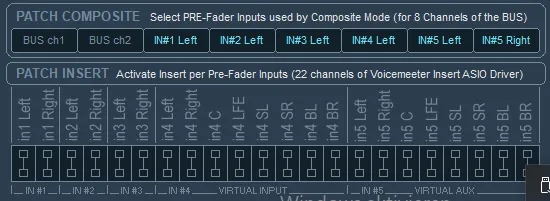
Plug-in integration VST (Patch Insert):
In the bottom of the “System Settings” window, it presides over the formidable “Patch Insert” function. This module intercepts the audio channels (Pre-Fader) by routing them to external computers, allowing the professional application of VST plug-ins (Virtual Studio Technology) for autotune, de-esser and advanced cleaning filters. There are excellent free VST hosts suitable for this purpose, such as the famous Cantabile Lite or the excellent open source project Vox.
Frequently Asked Questions about Voicemeeter Banana
What exactly does Voicemeeter Banana need?
Voicemeeter Banana is an advanced virtual audio mixer for Windows operating systems. It acts as a communication bridge between the hardware (USB microphones, headphones, audio cards) and the various software installed (browser, voice chats, live streaming programs like OBS). It guarantees you the possibility to separate, route, mix and equalize signals in completely independent channels, creating perfect scenarios for content creators.
What is the substantial difference between ASIO, WDM and MME drivers?
It is the three primary audio communication protocols of Windows. ASIO is a very low latency processing standard developed for professional audio (and is the top priority for dedicated interfaces). Architecture WHITE (Windows Driver Model) ensures excellent balance between hardware stability and low latency for standard user. Finally, MEMBER is the historical and most dated protocol: it maximizes software compatibility between old peripherals, but in the face of the highest signal delay ever.
How can I delete the audio echo or “loop” effect in my headphones?
This typical and annoying rhombus problem occurs whenever you send your microphone recording back to the same listening output (creating feedback). Please make sure that you do not illuminate the “A1” button (or the one corresponding to your headphones) within the mixer input channel where your physical microphone is placed.


