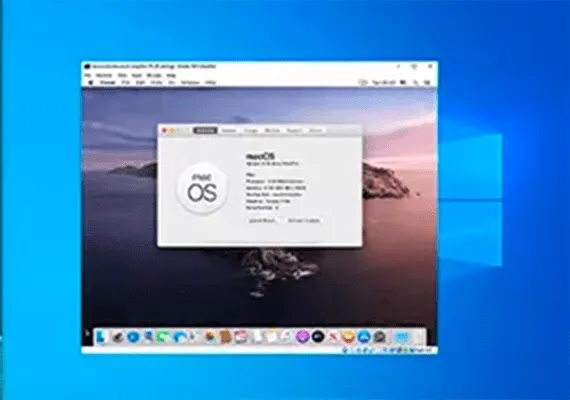
Want to try macOS without spending a fortune? Follow this guide and I will tell you how to emulate macOS on windows through VirtualBox (I've already talked about it in a previous article), a virtual machine software.
Download required
Before deepening the “how to do”, you need to download and install the essential tools. The tutorial explains how to create macOS virtual machine using Oracle VirtualBox Manager (VirtualBox).
You need a copy of macOS. Catalina is the latest version of macOS. You can find links for downloading macOS Catalina in the next section.
This tutorial will focus on installing macOS Catalina in a virtual machine running on Intel hardware, using VirtualBox or VMware Player.
Virtual Machine Creation
Download the latest version of VirtualBox. The tutorial uses Virtualbox 6.14
Virtual Image download
Use the following link to download macOS Catalina for VirtualBox.
If Google Drive reaches the download limit, right-click the file and select Copy to create a copy in your Google Drive. You can then download the virtual image of macOS Catalina from there.
macOS Catalina Virtual Machine Images (pass: Geekrar.com) The tutorial uses Virtualbox 6.14
After downloading the virtual image, right-click and extract the file using the preferred storage tool. For example, right-click, then select 7-Zip> Extract in “macOS Catalina”.
Download Extension pack
Before creating the macOS virtual machine, you need to install the VirtualBox extension package. Includes fixes for USB 3.0 support, mouse and keyboard support and other useful VirtualBox patches.
Download: VirtualBox Extension Pack for Windows (free)
Scroll down, select All supported platforms to download, and then double click to install.
Virtual Machine Creation
Open VirtualBox. Select New Digita macOS.
VirtualBox will detect the operating system during typing and switch to Mac OS X by default. You can leave it as it is.
As for the name of the virtual machine, make it something memorable but easy to type. You will have to enter this name in a series of commands and it is frustrating to type a complicated name several times!
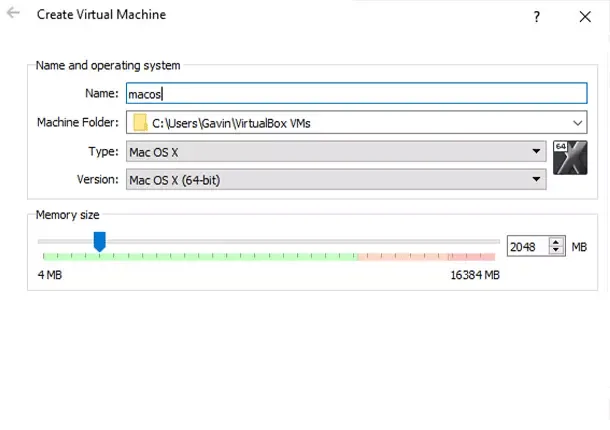
Then, set the amount of RAM that the macOS virtual machine can use. I would suggest a minimum of 4 GB, but the more you can give from the host system, the better your experience.
Remember that you cannot assign more RAM than that available in your system and you have to leave some memory available for the host operating system.
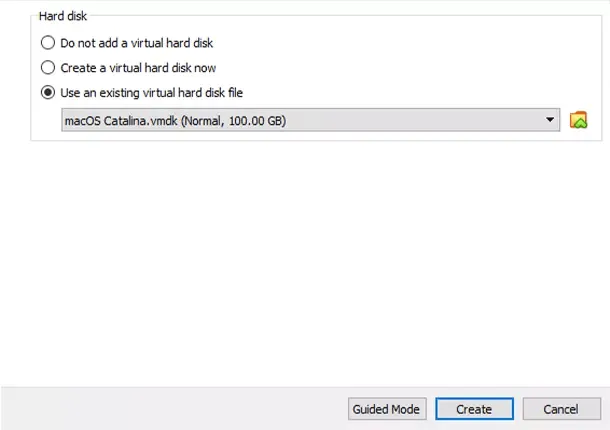
Now, you have to assign a hard drive, which is the previously downloaded virtual image. Select Use an existing virtual hard drive file, then select the folder icon. Switch to the VMDK file, then select Create.
Edit virtual machine setting
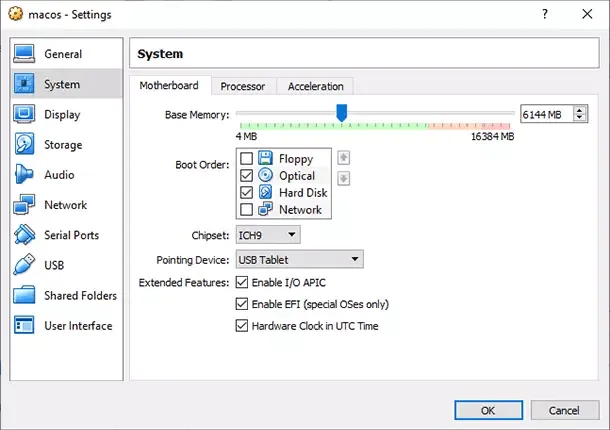
Do not try to start your macOS Catalina virtual machine yet. Before starting the virtual machine, you need to make some changes to the settings. Right-click the macOS virtual machine and select Settings.
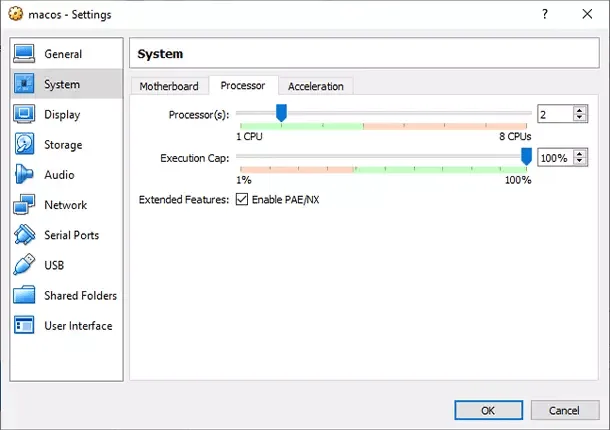
In System, remove Floppy from the start order. Make sure the chipset is set to ICH9
Select the Processor tab. Assign two processors. If you have a CPU with backup energy (such as an Intel Core i7 or i9 with multiple additional cores), consider assigning more. However, this is not vital.
Make sure the Enable PAE/NX box is selected.
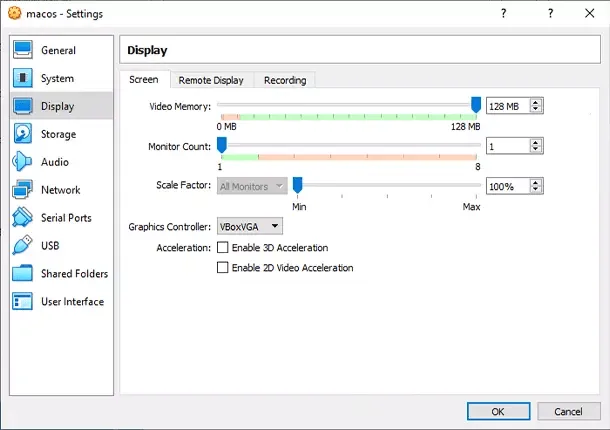
In Display, set Video Memory on 128 MB.
Now, in Archive, select the box next to Use I/O host cache.
Finally, go to the USB card and select USB 3.0, then press OK.
Personalized code
It is not yet time to turn on your virtual machine macOS Catalina. In its current configuration, VirtualBox does not work with macOS VMDK.
To make it work, you essentially patch VirtualBox before the macOS virtual machine works. To do this, you need to enter a code using the Command Prompt. All the details are below.
Start by closing VirtualBox. The commands will not be executed properly if VirtualBox or any of the associated processes are running.
Once closed, press the Windows + X button, then select Command Prompt (administrator) from the menu.
If your menu only shows the PowerShell option, type command in the Start menu search bar. Then right-click the best match and select Run as administrator.
The following code works for VirtualBox 5.x and 6.x.
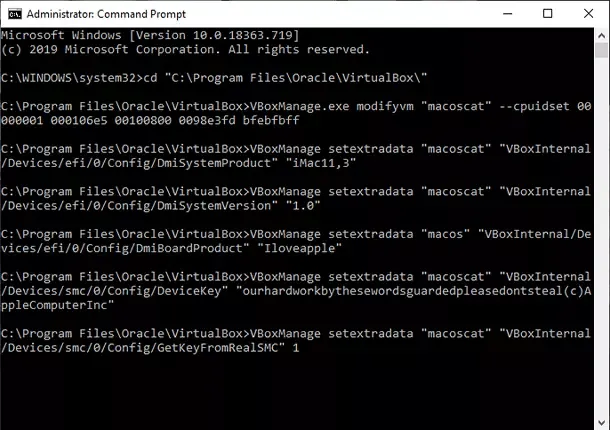
Use the following command to locate the Oracle VirtualBox directory:
cd "C:Program FilesOracleVirtualBox"
Now, enter the following commands, one by one. Adjust the command to match the name of your virtual machine. For example, my virtual machine name is “macoscat”. Here are the commands:
VBoxManage.exe modifyvm "macoscat" --cpuidset 00000001 000106e5 00100800 0098e3fd bfebfbff VBoxManage setextradata "macoscat" "VBoxInternal/Devices/efi/0/Config/DmiSystemProduct" "iMac11,3" VBoxManage setextradata "macoscat" "VBoxInternal/Devices/efi/0/Config/DmiSystemVersion" "1.0" VBoxManage setextradata "macoscat" "VBoxInternal/Devices/efi/0/Config/DmiBoardProduct" "Iloveapple" VBoxManage setextradata "macoscat" "VBoxInternal/Devices/smc/0/Config/DeviceKey" "ourhardworkbythesewordsguardedpleasedontsteal(c)AppleComputerInc" VBoxManage setextradata "macoscat" "VBoxInternal/Devices/smc/0/Config/GetKeyFromRealSMC" 1
After completion of the commands and assuming that no errors have occurred, close the Command Prompt.
Virtual machine start
Open VirtualBox. Double-click the macOS virtual machine to start it. You will see a long text flow, followed by a gray screen.
The gray screen may take a moment or two to cancel, but do not panic. Once deleted the screen, macOS Catalina will begin installation. When you fix it, you get to the macOS welcome screen.
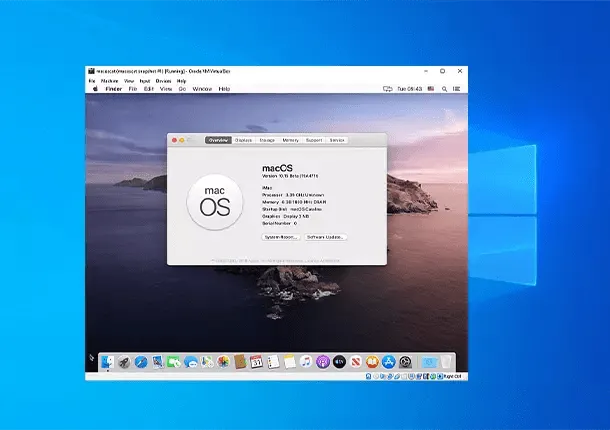
From here, you can configure your macOS Mojave virtual machine as you like.
Pro tip: snap a snapshot of your virtual machine once the gray screen passes. If something goes wrong, you can return to the home screen and restart the process.
Once macOS is installed, take another one so you can jump directly to the installation of macOS. Go to Machine> Instant shot, give a name to your instant and wait for it to be processed.


