In this guide we will use Python 3. You can freely download the latest version of Python 3 (3.5 at the time of writing) from the official website.
Python on Windows
On the download page you can find the .exe file for Windows 32bit and 64bit versions. Simply launch it and follow the various steps, remembering to select the Add Python 3.X to PATH entry at the beginning of the installation. After installation, by default Python will be placed in C:Python3X (e.g. C:Python35 for version 3.5). At this point it is already possible to use it, via Start -> All programs -> Python3.5 -> Python.
Having selected Add Python 3.X to PATH during installation, it should be possible to start Python from the command prompt by simply typing the command py or py -3.
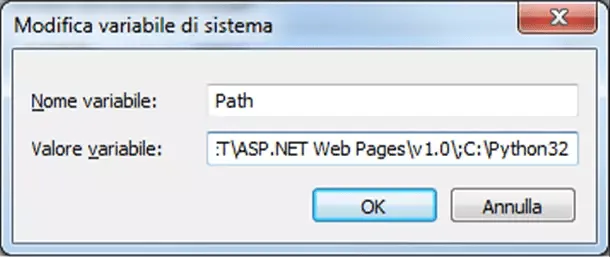
If we had not selected this option during installation, you can add Python to the PATH environment variable manually, following the following steps. First of all, let's go up Control panel -> System -> Advanced System Settings -> Environment variables. We then Modify the PATH variable between system variables by adding C:Python3X (where the X corresponds to the installed version).
Change of the Path variable
To verify that everything went well, we start the command prompt (Start -> Execute -> cmd) and we type:
echo %PATH%
If output includes string C:Python3X, you can start Python by typing simply py, py -3, o python:
Start of Python

If Python has been installed correctly, a short message will be displayed indicating the version of the Python interpreter, followed by the prompt ( >>> ).
On the official website is also available installation and use of Python on Windows.
Install Python on Linux
Python is already in the basic setup in Linux systems. It is however possible to check if there is and what versions are present. To do so, we type the following shell:
$ python
or:
$ python3
If both commands fail, Python is not installed. If python starts Python 2 and the command python3 is not present, only Python 2 is installed. If instead the command python or python3 start Python 3, then Python 3 is installed.
In case Python 3 is not installed, you will need to install it using the Linux system package manager: apt for Debian-based distributions, rpm for Red Hat-based distributions. Alternatively, you can download and fill in the Python sources manually.
$ yum install python3
For distributions based on rpm packages, such as Red Hat, Fedora, Centos
$ apt-get install python3
For Debian-based distributions, such as Ubuntu
Finally, let's see how to install Python by filling out the sources.
First, we have to check the latest version of the sources from the site, then we launch the following commands:
$ cd /tmp
$ wget http://www.python.org/ftp/python/3.x/python-3.x.tar.bz2
By doing so, we downloaded a .tar.bz2 archive containing Python sources. Let's extract the content now:
$ tar -xjf python-3.x.tar.bz2
$ cd python-3.x
Just start the installation:
$ ./configure
$ make
$ sudo make install
Note: You can use make altinstall instead of make install to prevent the newly installed version from being associated with the command python.
Install Python on Mac
As in Linux systems, even in Macs we should find Python ready to use. To verify it, once again just start a terminal window and type python. Probably version 2.7 will be shown, but we want to use the 3.X. Then you will have to visit the site and download version for Mac OS more suitable for our needs. Finally, we can proceed to the installation.
At the end of the installation, launching python from terminal will still appear the old version. Therefore, you have to open the terminal and type:
vim ~/.bash_profile
Once the file is opened, we add the following line:
alias python="python3"
Now, trying again to launch python from terminal, by default will start version 3.X.


