Voicemeeter Banana is a very powerful tool with an incredibly wide range of functions. Unfortunately, especially as a beginner, you quickly lose sight of things. This tutorial will help with the correct configuration and use.
Installation
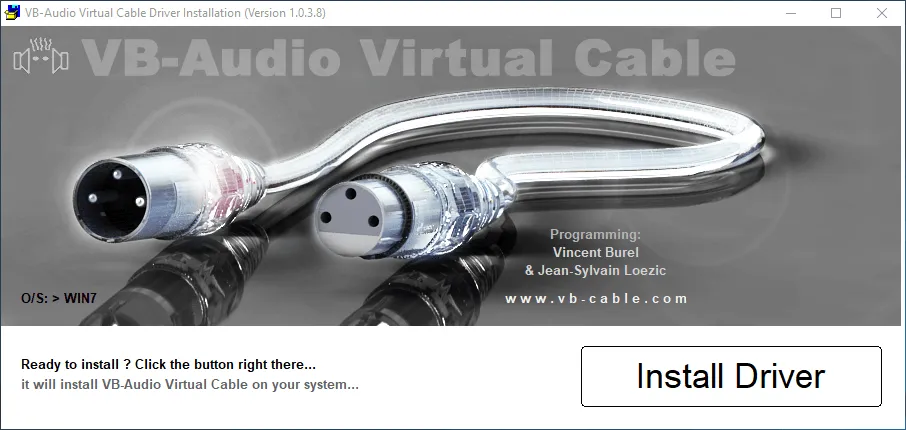
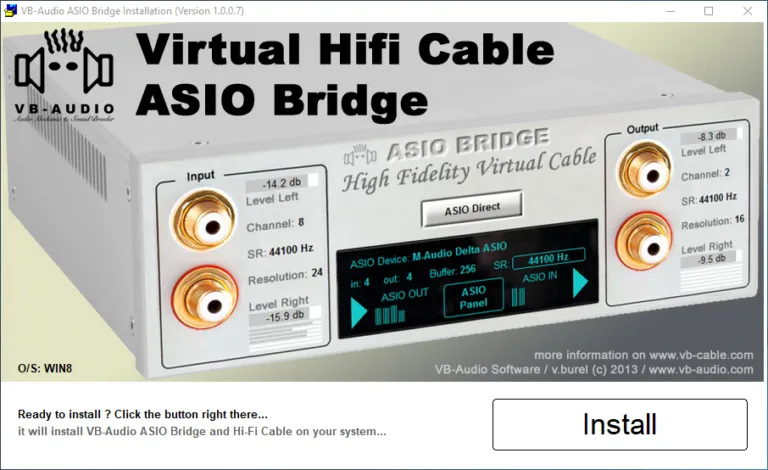
It is recommended to simultaneously install the VB-Audio cable and the Hi-FI VB-Cable cable from the same manufacturer, as the virtual mixer console can use different inputs. If you have an audio interface, you can also use it, as Voicemeeter Banana supports ASIO natively. Voicemeeter Banana as well as VB-Audio Cable and VB-Audio Hi-Fi Cable can be downloaded free of charge from the manufacturer's website. The Hi-Fi VB-Audio cable is located on the same download page of the VB-Audio cable, just scroll further down.
If you need more than 3 inputs and outputs provided by Voicemeeter Banana, you can use Voicemeeter Potato instead. The configuration is almost identical. Voicemeeter Potato has 5 inputs and outputs instead of 3 inputs and outputs, as well as an additional virtual input and also has some other functions. But the basic functions are the same. After installation, it is particularly important to ensure that your computer is restarted.

Configuration Banana Voicemeeter
As soon as the computer has been restarted, Voicemeeter Banana can be started for the first time. The first time you start, you will be welcomed with a modern design. The first thing is that a red text with “Select main output device (A1)” flashes in the upper right corner.
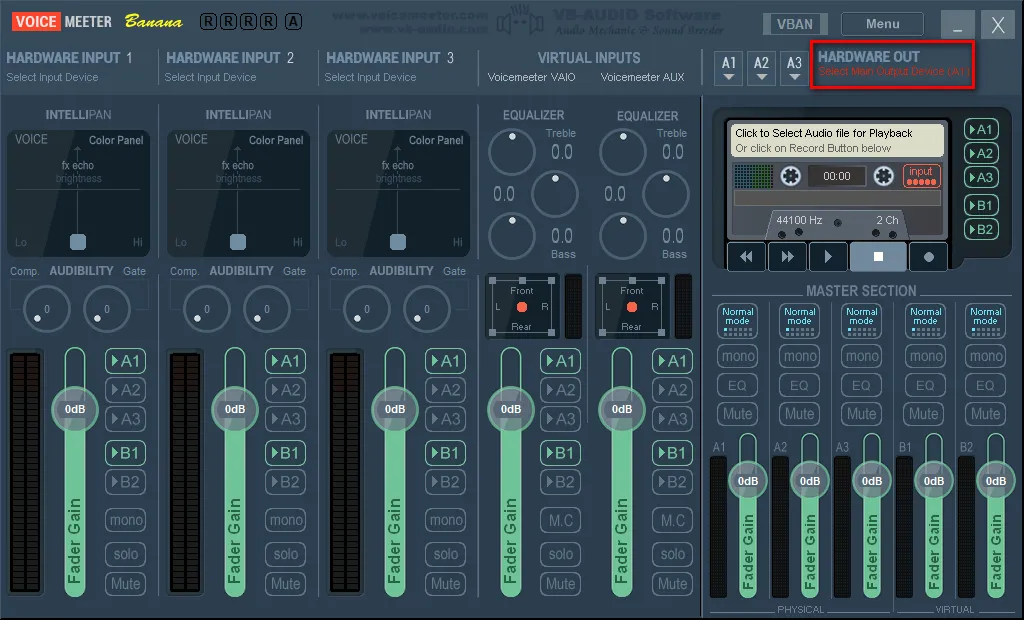
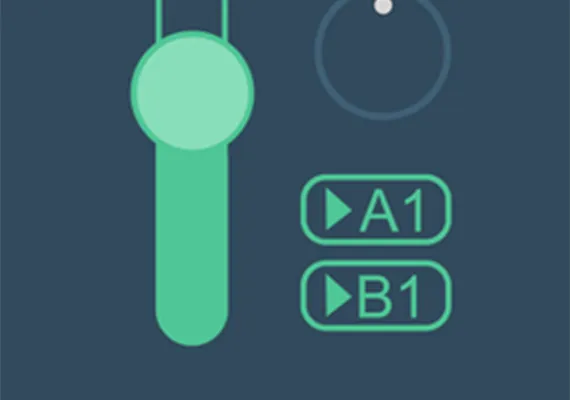
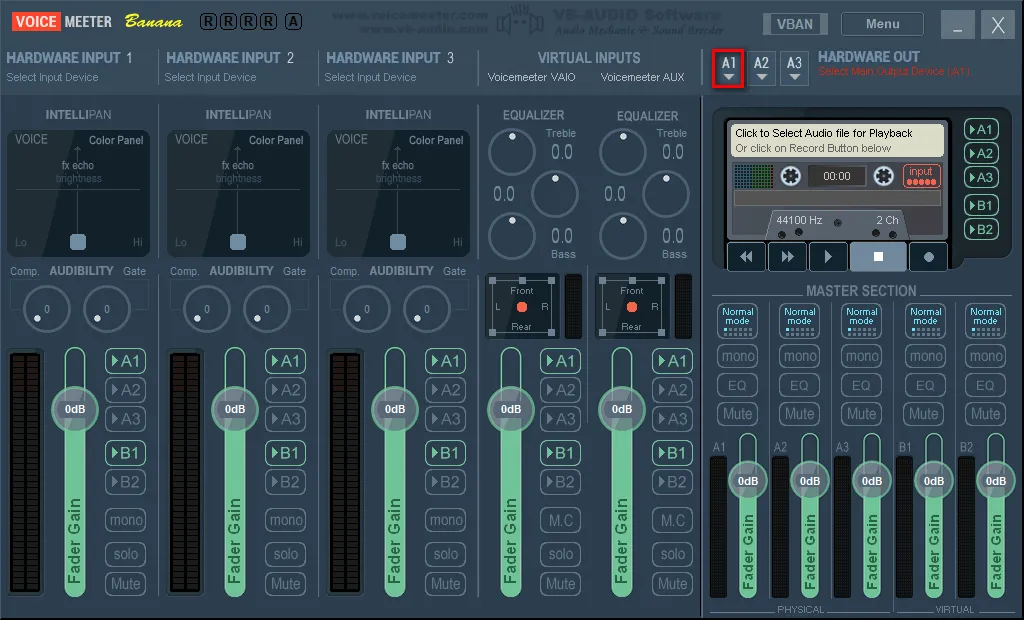
First, the A1 exit must be assigned. That would be your speakers or your headphones. All you have to do is click on A1 next to the flashing red text and select a corresponding output. You can use up to 3 different outputs at the same time, for example to send music to headphones and everything else to the speakers. With Voicemeeter Potato there are even 5!
There are several options here to communicate with the selected device. That would be WDM, KS and MME. In most cases there is no ASIO. If ASIO is available, it is preferable, otherwise we recommend WDM or KS.
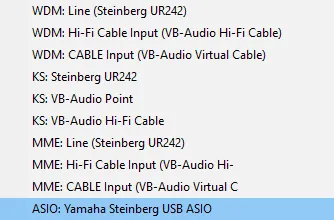
In case of problems, always choose MME as the last option. ASIO tends to have the best latency, followed by KS and WDM. MME has the worst latency of all. You normally want to get the lowest latency possible.
The audio engine will now be started for the first time. It'll take a few seconds. So first we turn off all green "A1" and "B1" to avoid possible audio loops from our microphone, which we will add shortly.

Now you can add the two virtual cables installed VB-Audio Cable and VB-Audio Hi-Fi Cable and, if necessary, a microphone on the top left. This is labeled as "Hardware Input 1", "Hardware Input 2" and "Hardware Input 3".
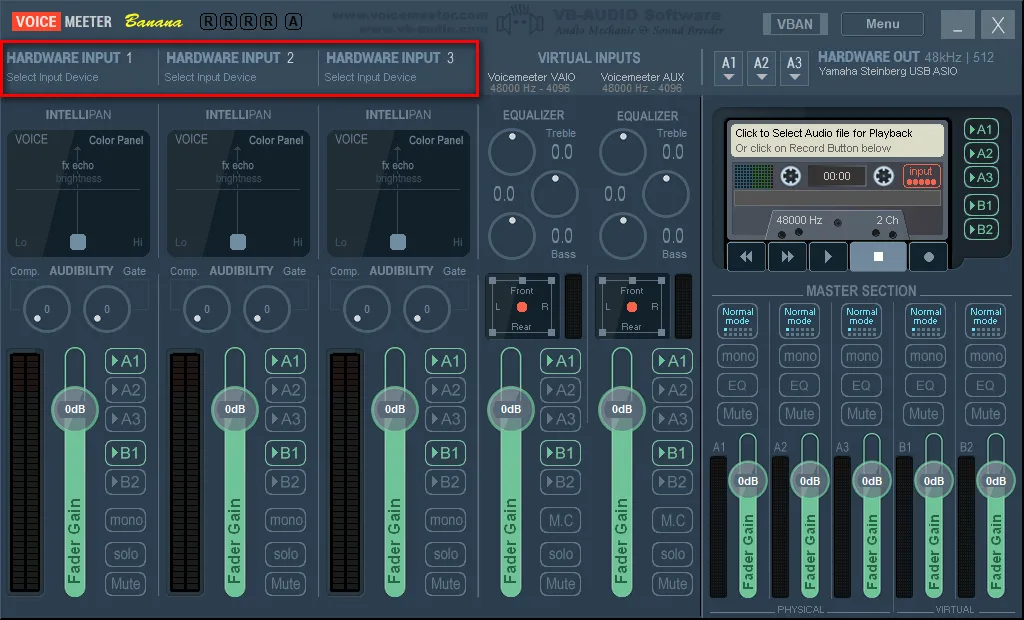
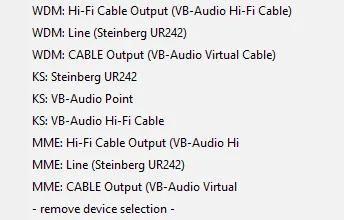
If you click on it, you open a drop-down menu with all possible inputs. Also in this case are possible WDM, KS and MME. With a right click you can assign your name to the input.
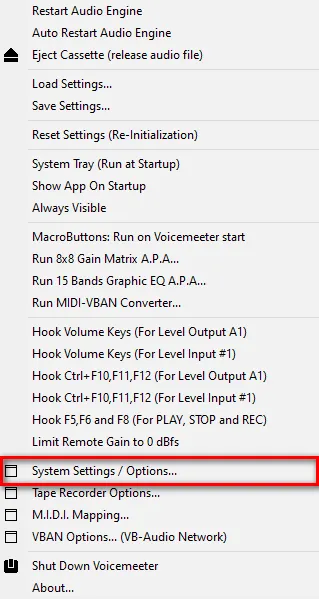
Then click on “Menu” at the top right and a drop-down menu will open. Here you can perform some settings, but first you should click “System Settings / Options”. A new window opens. At the bottom, under «Preferred Main SampleRate» you can now select the desired sample rate. In most cases 44100 or 48000 Hz are sufficient. I chose 48000 Hz. It is also recommended to adjust the sampling frequency of the device with the lowest sampling rate possible. For example, if your microphone can only be selected up to 44100 Hz in Windows, it is better to use 44100 Hz anywhere in Voicemeeter Banana. This prevents unnecessarily resamping the sample rate.
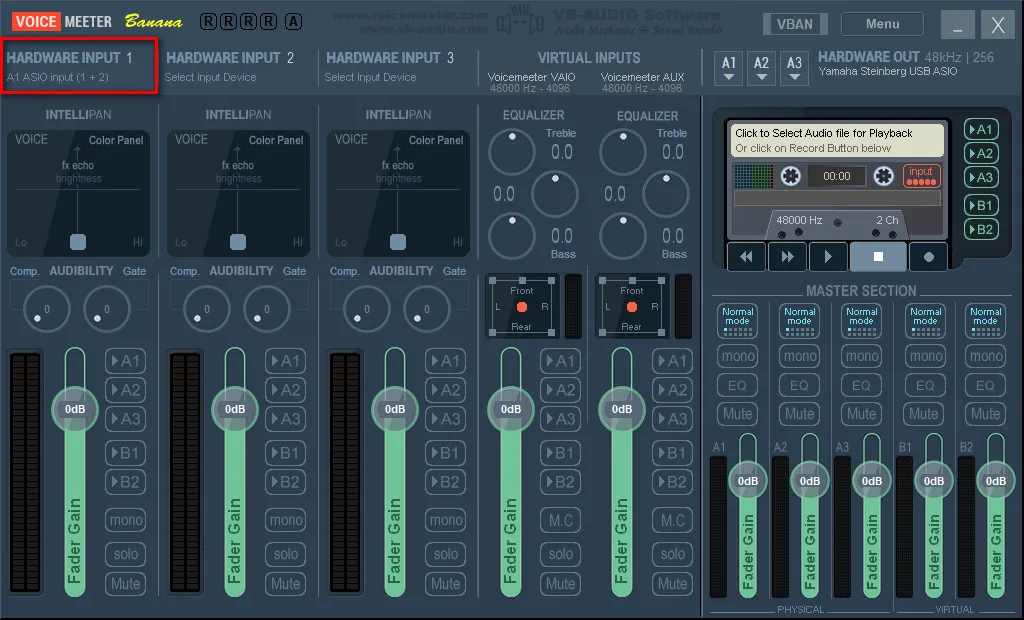
If you have an audio interface that supports ASIO, you can also add inputs from the interface via ASIO in «Patch ASIO Inputs to Strips:». I assigned inputs 1 and 2 from the interface to “Hardware Input 1” in Voicemeeter Banana. It should be noted that the hardware input selected for this is not already in use. In Voicemeeter Banana the hardware input is then identified as ASIO A1 input.
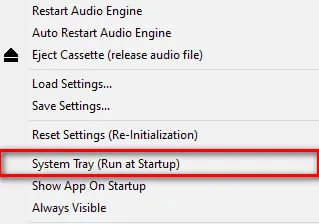
To get the sound through the selected output, Voicemeeter must be selected as a standard output device in Windows audio settings. This also applies to input devices, including the microphone. With Voicemeeter Banana we use a virtual microphone. That's why we go to the audio settings in Windows. The point behind this is that everything is previously routed and managed by Voicemeeter Banana. It is therefore recommended that Voicemeeter Banana automatically start after Windows startup.
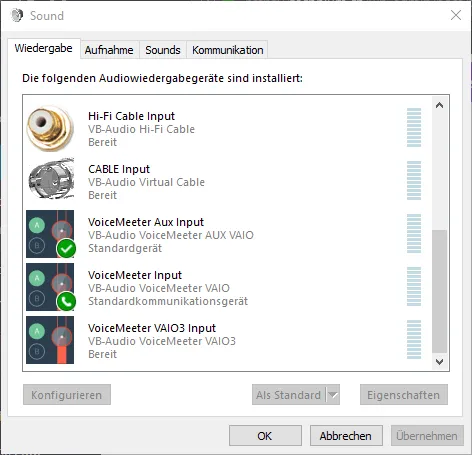
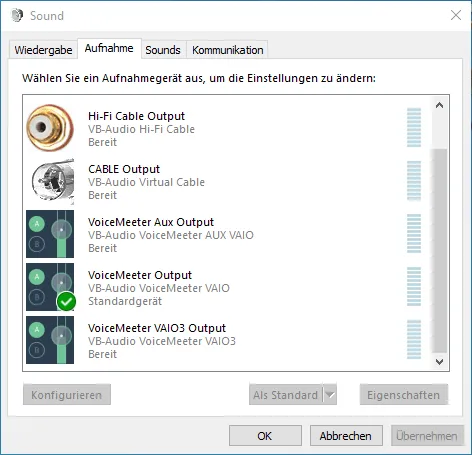
Now click on the small speaker symbol in the bottom right corner of the desktop and click on “Open Audio Settings” and then click on “audio Control Panel” to the right. Here we right-click to set «VoiceMeeter Aux Input» as a standard device and «VoiceMeeter Input» as a standard communication device. On the recording board we set both on «VoiceMeeter Output» as a standard device and as a standard communication device.
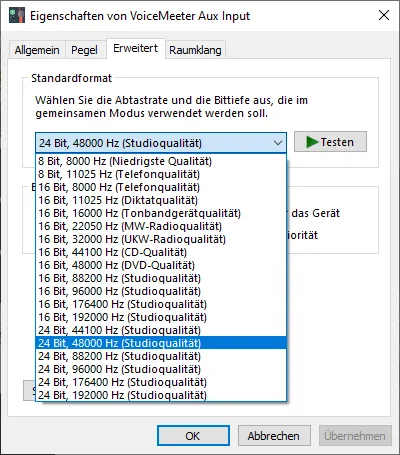
Then we check that all playback and recording devices are used at the same sampling rate. To do this, right-click a playback or registration device and click Properties. Then go to the Advanced tab. This applies, for example, even for your speakers or your microphone and not only Voicemeeter Banana and the virtual cable!
Please close Voicemeeter Banana first. To do so click on Menu in the upper right corner of Voicemeeter Banana and then click on “Spegni Voicemeeter”. Then we ship to Windows in the installed program installation directory and start the following files. EXE as administrator. These are by default in:
C:Programs (x86)VBVoicemeeterVBCABLE ControlPanel. ex
C:Programs (x86)VBVoicemeeterVBVMAUX ControlPanel. ex
C:Programs VBCABLEVB-AUDIO Virtual Cable Control Panel. ex
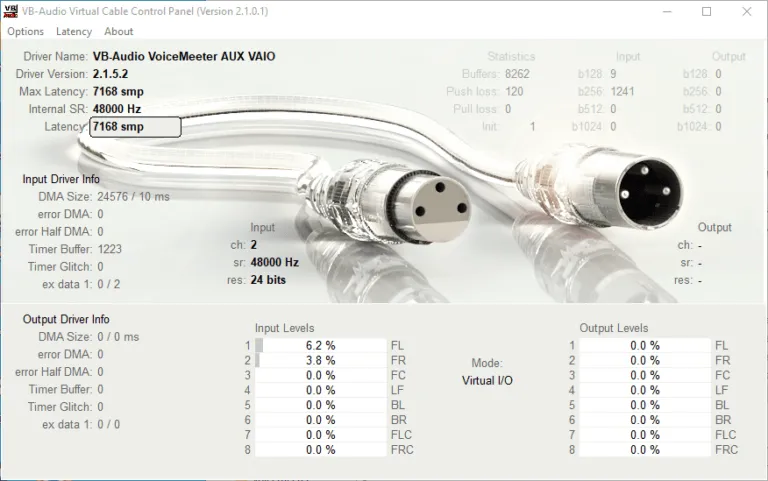
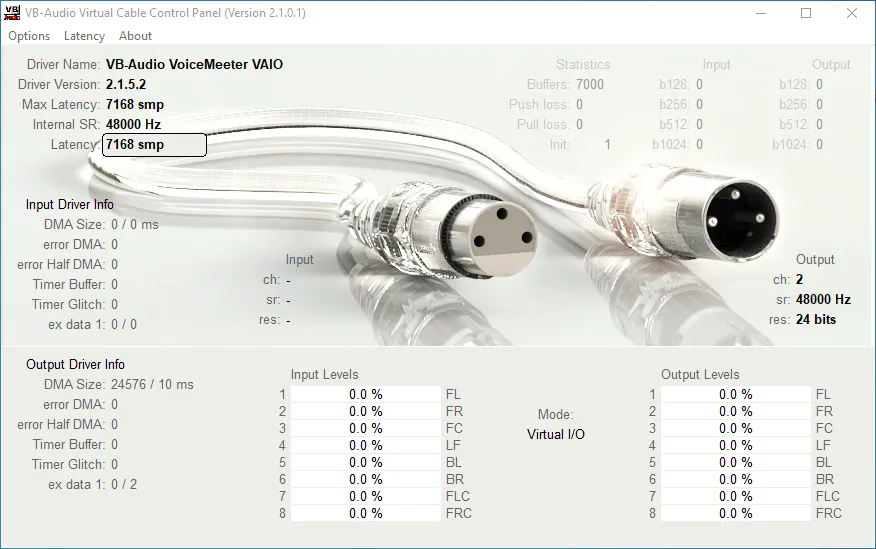
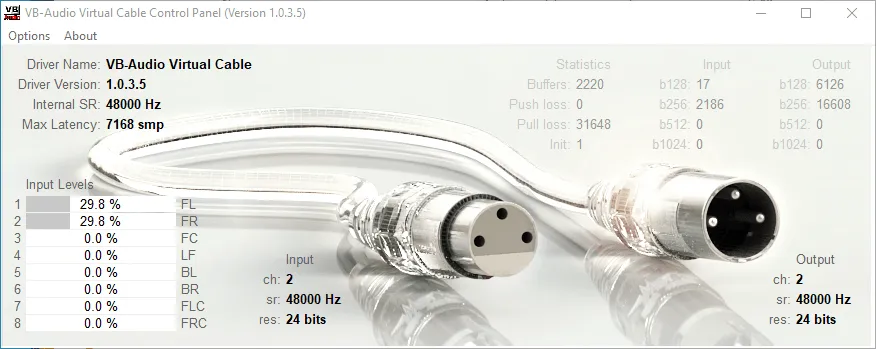
Here we check again that all cables use the same sampling frequency.
If you use Voicemeeter Potato, you should also check the following .EXE:
C:Programs (x86)VBVoicemeeterVBVMVAIO3 ControlPanel. ex
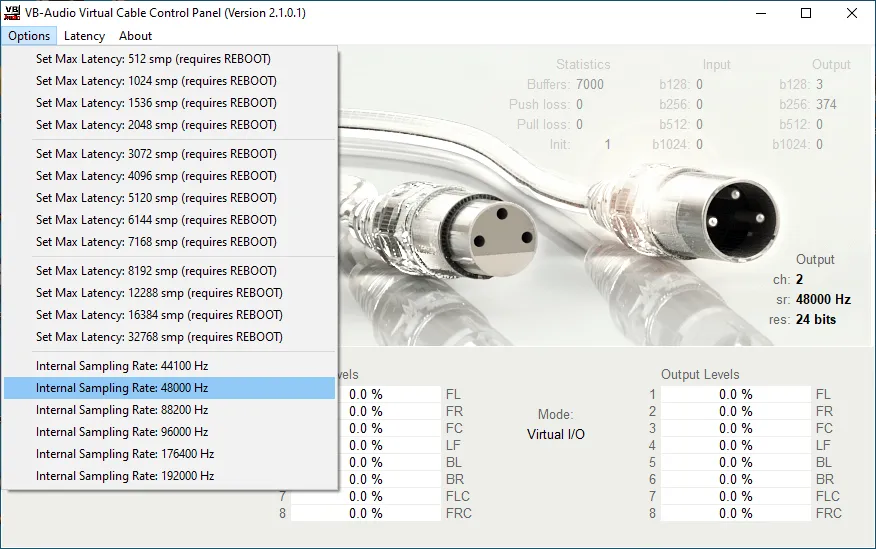
You can also improve latency here. To do this, simply let the music constantly run through the cable and watch statistics. Then choose the largest number that has no statistics and multiply this x3. In this case this would currently be '512', so I could set latency on 1536 smp.
But this can change. Therefore, you should constantly load the cable and observe statistics. It should also be said that this simple calculation is correct only if the sampling rate is the same everywhere. If different sampling frequencies are used, it is a little more complicated. For VB-Audio Hi-Fi Cable simply set the sampling rate in Windows. You can also improve latency with this cable. You can do it here:
C:Programs (x86)VBASIOBridgeVBCABLE AsioBridge. ex
Now the computer must be restarted and the installation would be complete.
Voicemeeter Basic functions of Banana
After restarting the computer, we open Voicemeeter Banana and use the basic functions. That would be the general path, the Intellipan panel and a gate.
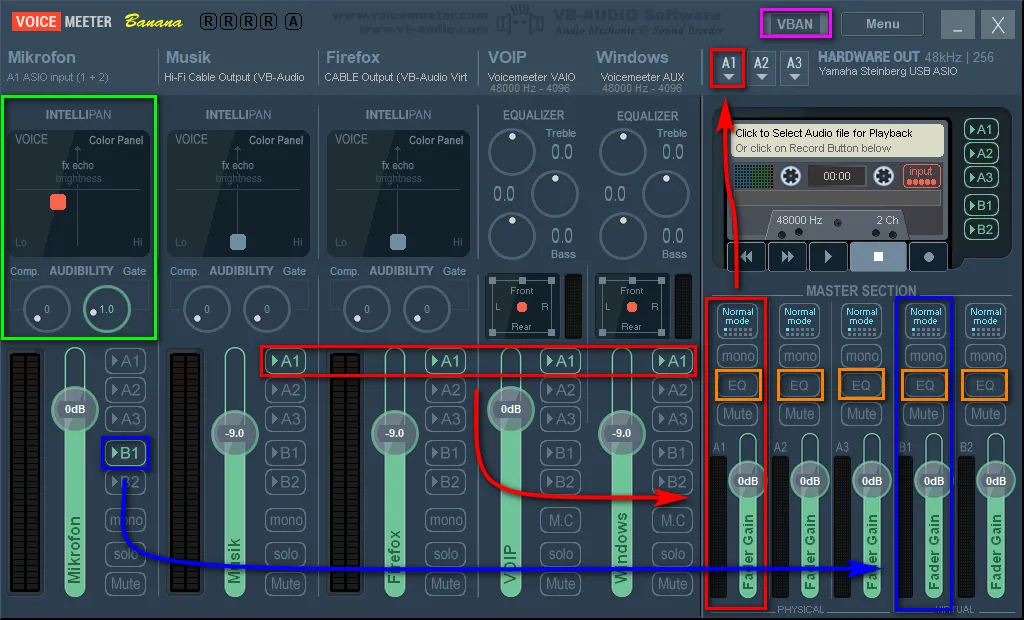
Since we set the standard playback device on “VoiceMeeter Aux Input” in Windows, now everything should be played on Voicemeeter AUX. In the photo this is Voicemeeter AUX (Windows). Incoming calls from Discord or Steam should be automatically on their track, because we set the standard communication device on “VoiceMeeter Input” in Windows. In the photo this is Voicemeeter VAIO (VOIP).
Brief explanation:
Red: all tracks with “A1” selected are mixed together and sent to exit A1. In my case it is VB-Audio Hi-Fi Cable (music), VB-Audio Cable (Firefox), Voicemeeter VAIO (VOIP) and Voicemeeter AUX (Windows), which are then transmitted to the Steinberg audio interface.
Blue: all tracks with “B1” selected will be mixed together and sent to exit B1. This is “Voicemeeter Output” in Windows recording devices. In my case this is just the microphone. You may also add the “Firefox” channel to annoy your friends on Discord with YouTube videos, provided you have assigned to this track the output device for Firefox, but we will arrive in a moment.
Green: I added a small improvement of the voice and a gate to the track for the microphone with the Intellipan “Voice Color Panel”. There is also a compressor. If you do not start with the terms, here is a small explanation: a gate suppresses silent sections. This means that the microphone signal is transmitted only from a certain level. A compressor reduces the volume difference between silent and noisy passages. So, if you are too low or too high, the volume is dynamically adjusted. The dynamics are affected, which is why I do not use it.
You can try a little with the voice color panel. The best thing to do is turn on the "A1" microphone to control your voice. But be careful, use the headphones at the exit, otherwise you can get a bad audio loop! By right-clicking the color panel of the item you can switch from “Color Panel Voice”, “Modulation FX Panel” and “3D Panel Position”. You can restore settings with a double click. With the Modulation FX Panel you can make your voice more similar to that of a robot. So some kind of little voice change. The 3D panel position is probably self-explanatory.
Orange: with a right click you can open a nice parametric equalizer to 6 bands here. With a left click you can activate the equalization for the mixed track.

Viola: with a left click you can open the VBAN window here. With VBAN you can send audio to other computers using Voicemeeter Banana. You can also do it on the Internet (you need port forwarding). Particularly interesting is the use of a second computer for streaming. The secondary computer therefore does not need an audio card for recording. Learn more about this at the end of the tutorial.
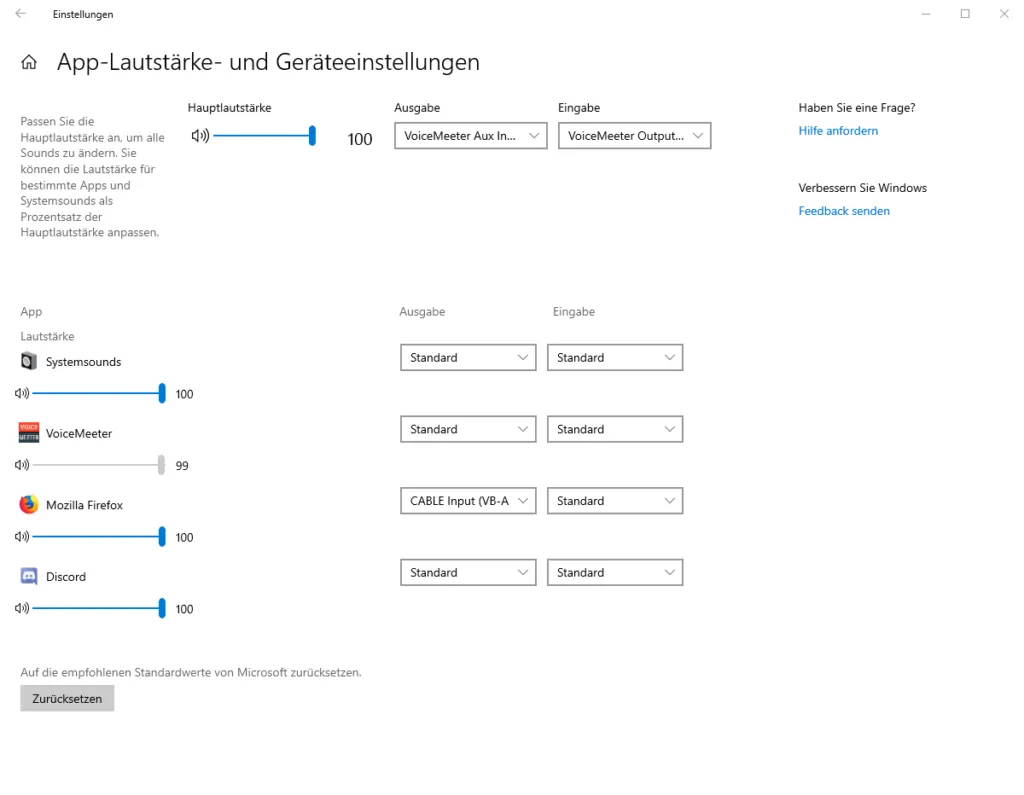
Now you just have to assign other output devices to programs so that they do not use the standard playback device. Most of the time you can select the output device directly in the applications. With Firefox / Chrome this doesn’t work directly in the browser and has to click the small speaker symbol in the lower right corner of Windows, click on “Open Audio Settings”, scroll down and under “Advanced Audio Options” on “Volume app and click Device Settings”. Then assign a different output device while Firefox / Chrome is open. In my case, I chose «CABLE Input (VB-Audio Virtual Cable)».
To better understand your conversations now you can simply lower all other tracks except VOIP. Set the controller with the mouse or enter a number manually with a right click. In general, you should just lower it and not raise it to avoid clipping.
This would be practically the basic functionality of Voicemeeter Banana. If you face it a bit, you understand the logic behind it pretty quickly.
Other useful functions
Use multimedia buttons:
In the menu drop-down menu you can assign the Windows media keys labeled as “Hook Volume Keys (For Level Output A1)”. If you use media buttons, you may not accidentally exceed 0 dB.
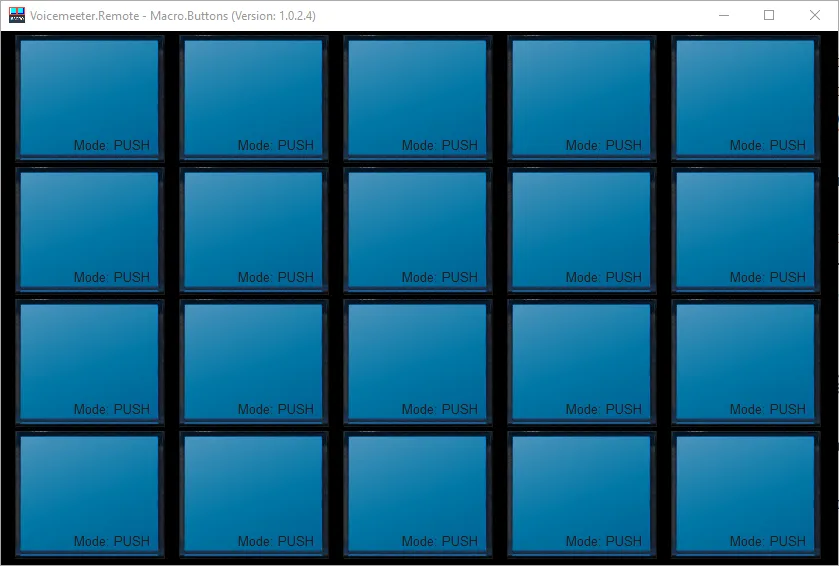
Macro buttons:
In the menu drop-down menu you can use the macros with «Buttons Macro: Run on Voicemeeter Start". You can use many Voicemeeter Banana functions with just one quick click. With it it it is also possible to build a kind of small harmonic table. But it can be a bit more complicated and is more recommended for experienced users. The documentation of the manufacturer is extremely useful.
VBAN Feature:
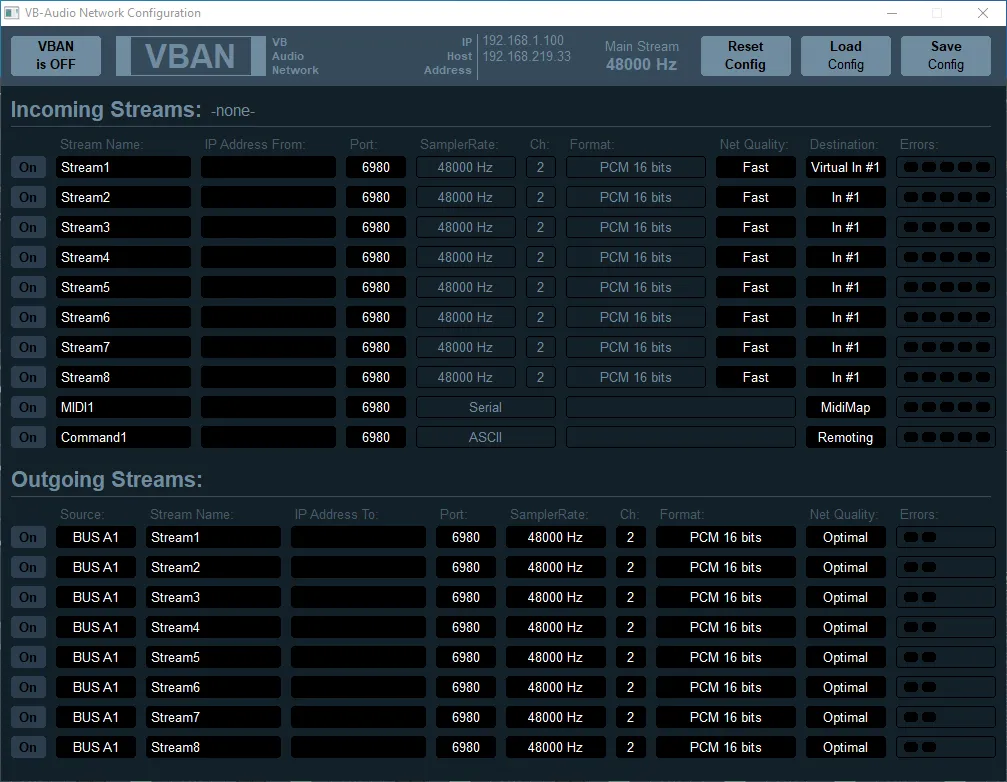
To use the VBAN function, you just need to enter an IP address on a second computer that also installed and started Voicemeeter Banana in the Outgoing Stream panel. Instead, the IP address of the first computer that sends the flow must be inserted on the second computer.

You can read IP addresses in the VB window at the top of the center (red square). Also the VBAN should be activated in general. You can do it on the top left (purple square). This must be done on both computers, i.e. on both instances of Voicemeeter!
First of all, you need to start an output stream in the Output Flows panel section. I highlighted how to do it in an extra color:
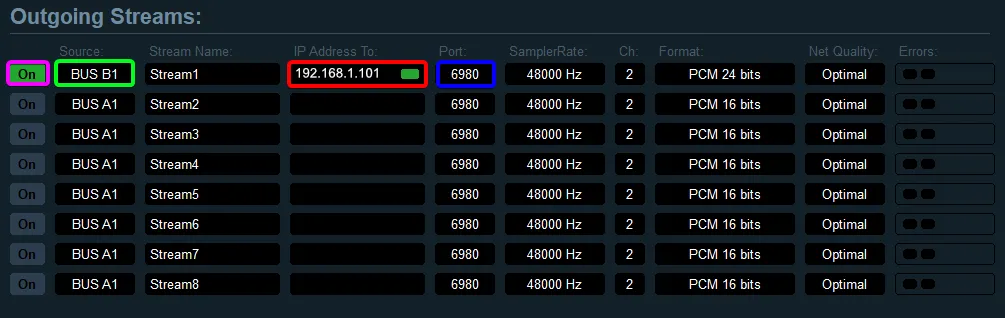
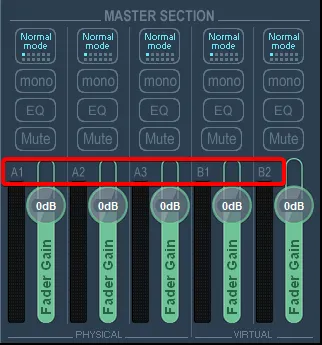
Green: here you select the desired channel to send. These are Master A1, A2, A3 and B1, B2 selections. In this case it is B1.
Red: here enter the IP address of the second computer to which the stream must be sent. If a stream must be sent to the Internet, you must enter the IP address assigned by the Internet provider here. But be careful! For most of them this is dynamic and changes after a certain time. In this case you also need a DynDNS provider.
Blue: the door can be left on standard port 6980. As long as you send a stream to your local network, additional settings should not be required.
Now you have to enter the IP address of the first computer in the incoming stream panel compartment on the second computer, so that even a stream can be recognized. Here too I have colored the most important parts:
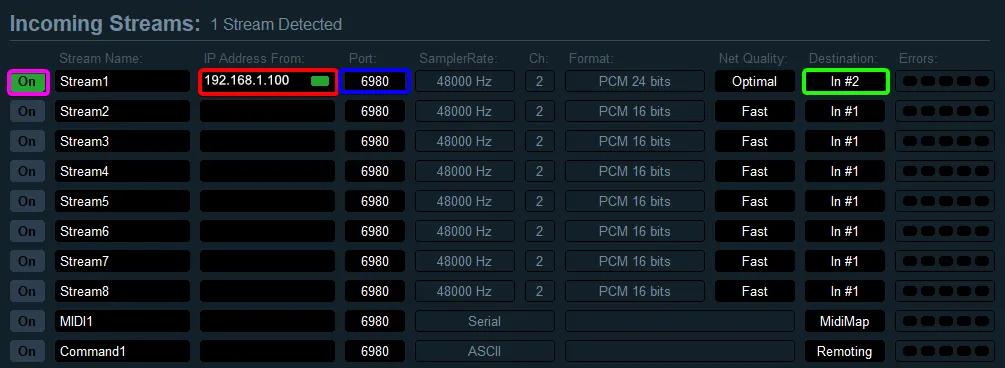
Red: Enter the IP address of the first computer from which the stream is sent. If a stream is sent to the Internet, you must enter the IP address assigned by the Internet provider here.
Blue: as in the outflow, you can safely leave the door on 6980. Only in case a stream is to be sent to the Internet, this port must be inserted into your router to forward the flow to the correct computer.
Green: here you select the desired channel to assign the received stream. These are "Hardware Input 1", "Hardware Input 2", "Hardware Input 3" and "Voicemeeter VAIO", "Voicemeeter AUX". In this case it is "Hardware Input 2". It does not matter whether the entrance is already occupied or not.

Viola: As before, the incoming flow must also be activated.
The stream should now have been sent and received now.
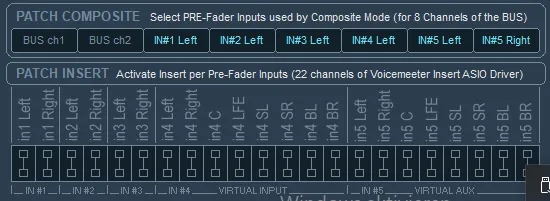
Patch composite:
In the menu drop-down menu, in the “System Settings” window, there is a “Lock Insert” feature below. This allows you to send the input signal to a VST host in advance to use VST plug-ins. For example, you can use Cantabile or Vox . Both available for free.